Have you ever looked at a machine the size of a loaf of banana bread and thought, “Sure, but can it produce a tiny dragon with cheekbones sharper than mine”?
Why I Picked the MALYAN S100 Mini Resin 3D Printer
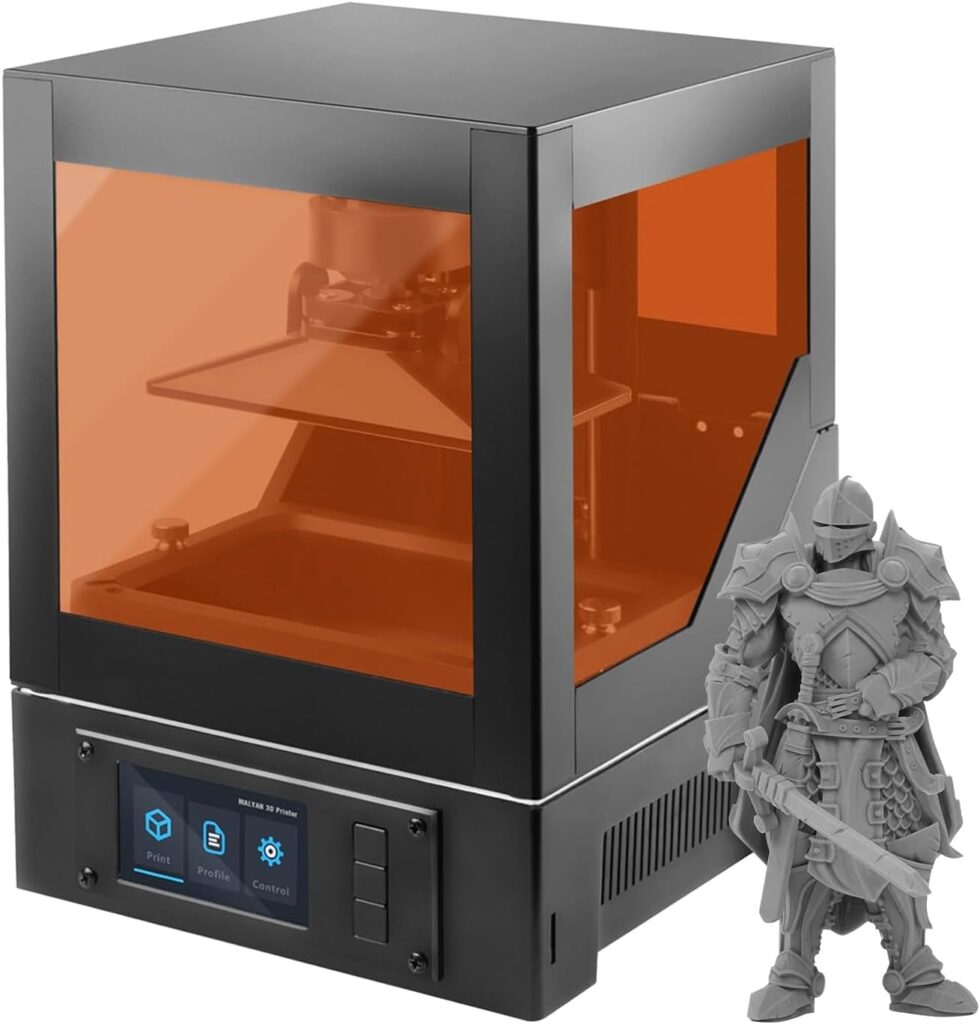
I bought the “MALYAN S100 Mini Resin 3D Printer with 5.5″ 2K LCD Curing Screen, High Precision, Auto Leveling, Printing Size 115 x 65 x 110 mm, Beginner Friendly” largely out of stubborn curiosity. I wanted something small, relatively affordable, and—if possible—less temperamental than the last desktop gadget that promised to make me a renaissance artisan and instead made me a frequent customer at the vinegar-and-paper-towels aisle. The S100 looked promising: compact, auto-calibrating, a magnetic build plate (which sounded like a refrigerator had a baby with a tech startup), and the sort of resolution numbers that make miniature enthusiasts whisper reverently.
This printer is pitched squarely at beginners. I can confirm that as someone who has absolutely considered tossing sticky tools out the window, the S100’s promise of “printing right out of the box” had me at hello—metaphorically. There is something soothing about a box that insists I don’t need to outthink it.
Unboxing and First Impressions
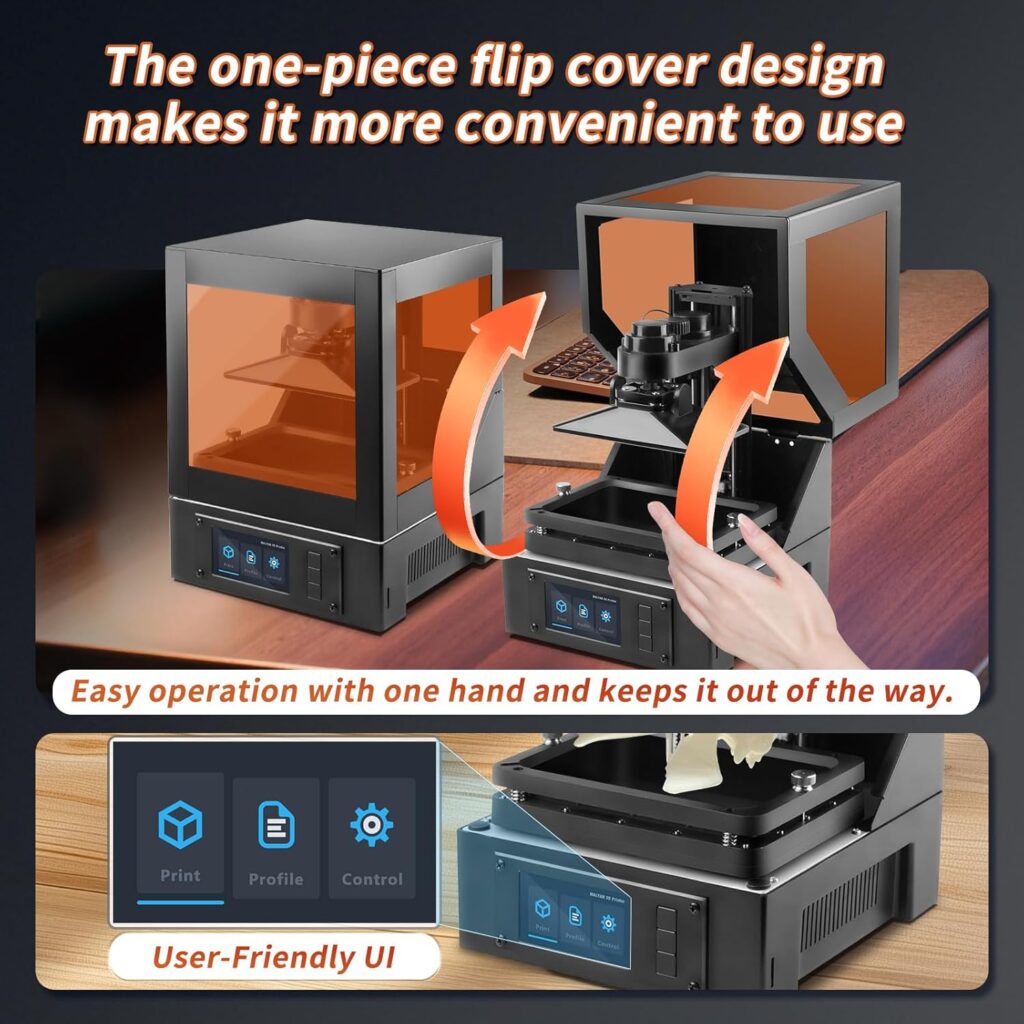
If you’ve ever unboxed a resin printer, you know the ritual: unwrap, defoam, pretend you know what you’re doing, and then look on YouTube just to make sure. The S100 spared me some of the usual pageantry. The form factor is tidy and upright, like a polite guest in a red (or amber) acrylic hat. The control panel is straightforward, not hyperactive with icons that look like they mean business but then take you into an error submenu.
What Came in the Box
What mattered most was that everything I needed to get a print going was present and brushed its teeth before arriving: the printer, the magnetic build plate, the resin vat, the tools, and the power supply. With resin printers, I never assume the included tools will be good enough. But here, the essentials were respectable. I still used my favorite scraper, because that scraper and I have an emotional bond at this point, but I didn’t need to run out to buy emergency accessories.
Build Quality and Design
The frame felt solid and well-aligned. The vat slid into place with that satisfying “I’m in charge here” thunk. The vertical rail moved without wobble. That mattered to me. I am not looking for a printer with more opinions than I have. The S100 felt sturdy, balanced, and not overcomplicated by ornaments or superficial features. It’s a little powerhouse without the clinginess.
Setup: From Cardboard to First Print
Even though I appreciate a challenge from time to time, I don’t want to start my relationship with any device by interpreting a chord of beeps. The S100 avoided the melodrama I’ve encountered with other machines. It practically held my hand (figuratively, of course, because resin).
One-Click Auto Calibration and Leveling
The S100 offers one-click auto calibration and auto leveling. This isn’t one of those passive features that pops up once and then hibernates. It automatically calibrates and levels whenever a print is started. This, I discovered, is like living with someone who makes the bed every day without reminding you they made the bed. It just happens. I can confirm that this removed about 85% of the dread from the first print. I didn’t need to loosen screws and press down with exactly five kilos of weight while reciting a protective incantation. I simply followed the prompts, and the printer did what it promised. Sweet mercy.
Software and Model Preparation
Resin printers, by their nature, depend heavily on slicer profiles and resin settings. I prepared my models the usual way, with supports and hollowing where appropriate. I used typical resin slices and set exposure settings based on the resin manufacturer’s guidance. The S100 didn’t complain. If you’re new to resin printing, this is the part that seems like translating cryptic poetry into kitchen measurements. But trust me: once you get a baseline exposure and lift speed set that matches your resin, you’ll be printing reliably.
Resin Prep and Safety
I’m a cautious person around resin. Gloves on. Ventilation on. Paper towels ready. The S100 doesn’t change the fact that liquid resin is not your friend and doesn’t want to become your friend. But I found the vat easy to pour into, and the build area is small enough that cleanup didn’t feel like I’d staged a minor disaster. The form factor encourages tidiness, which I appreciated since spotting resin drips after the fact is like spotting a smug cat on a bookshelf—cute, but you didn’t approve this.
Print Quality: What My Eyes And Calipers Noticed
I began with test models I know like the back of my hands: a calibration cube, a mini bust with hair strands that exist purely to torment, and a set of tabletop figures where capes threaten to fuse to knees if a printer so much as thinks about underexposure.
The 5.5-Inch 2K LCD Screen and Resolution
The S100 uses a 5.5-inch LCD with a resolution of 2560 x 1440. On a screen this size, 2K equates to a nice balance between detail and speed. I measured edges and features on the calibration cube, and they were consistent within a margin that made me nod approvingly. Details like wrinkles on tiny faces, hatch patterns in armor, and the faint lip of a screw head all came through cleanly. The S100 puts detail where I ask for it, and it doesn’t seem to get bored mid-job, which I appreciate in both machines and people.
Upgraded 57W Parallel LED Light Source
If the LCD is the storyteller, the light source is the lighting designer, and this printer appears to hire well. The 57W parallel LED array provides a uniform, stable light field. In practical terms, this meant the usual suspects—grid lines, inconsistent exposure toward the edges of the build area, faint banding—were noticeably reduced. The surface finish had a smoothness I normally associate with printers a tier or two higher. Layer lines didn’t vanish entirely (physics still applies), but on most prints I had to look for them. The overall smoothness of curved surfaces was particularly satisfying. If you paint minis, you’ll notice it during priming: there’s less sanding, less resigned sighing, more time deciding which shade of red your villain’s cape requires.
Surface Finish and Layer Consistency
There’s a temptation to say the S100 produces “flawless” prints, but I don’t trust the word flawless. What I can say is that the printer trended toward clean surfaces without those diagonal moiré patterns that make a figure look like it’s been sleeping in chainmail. When layer lines did appear, they were faint and consistent, which, yes, I realize sounds like I’m describing a well-behaved spreadsheet, but that’s exactly what you want from a printer.
Dimensional Accuracy and Fine Features
On mini mechanical parts—tiny gears, snap caps, and decorative panels—I saw good adherence to nominal dimensions. Holes printed slightly tight (a resin tradition), which I adjusted for by tweaking exposure and hole compensation in the slicer. Thin features like 0.3–0.4 mm ridges held up, provided I oriented the model well and didn’t cheap out on supports. Again, the S100 didn’t bend the laws of physics; it just handled them gracefully.
Build Plate and Adhesion
Adhesion is one of those topics where a printer can either be a cherished ally or the stuff of late-night grumbling. The MALYAN S100 leaned toward ally.
Magnetic Build Plate Convenience
That magnetic build plate is a simple pleasure. It attaches with confident strength and removes without an arm-wrestling match. The magnet held steady during printing, which is important for the auto-leveling system to hold its geometry. After a print, I lifted the plate, peeled it off its magnetic base, and got to scraping and rinsing without fear of nudging the printer’s alignment. If you batch print or run multiple small jobs, this plate speeds up the process in ways you feel in your shoulders and your soul.
Laser-Engraved Platform for Adhesion
The laser-engraved surface has that slightly textured feel that’s good for adhesion without becoming clingy. My first few prints held firmly, even with tall and skinny structures that usually like to topple. I always recommend a calibrated bottom exposure and a few robust bottom layers. On the S100, once I set those correctly for the resin at hand, I stopped worrying about corners curling up like dried leaves. It was a relief. If you’ve had a print detach mid-job, you know the dread of fishing out the remains while talking to your vat in a tone you reserve for plants.
Removing Prints and Cleaning
Removing prints from the textured plate was efficient: a well-angled scraper did the job without gouging the surface. And because the plate pops off magnetically, I could work more deliberately without risking the rest of the machine. Cleaning the plate and vat between jobs felt easy. I didn’t need to perform a ballet with paper towels and a flashlight. That said, I still recommend filters and patience, especially when changing resins.
Print Volume Realities
The size is an honest-to-goodness 115 x 65 x 110 mm. This is not a printer for helmets, vases, or the sort of sculptures that require you to sign for a package with both hands. It is perfect for what I’d call precision knickknacks: minis, jewelry prototypes, small functional parts, and props that fit in the palm.
What Fits, And What Doesn’t
I printed a small architectural facade, a set of 32 mm and 40 mm miniatures, and some small brackets for a desktop organizer. Everything fit comfortably. I could arrange a handful of pieces at once, provided I was careful with support spacing. For larger figures, I printed in parts and joined them post-cure. It felt like a reasonable compromise for a printer with such a compact footprint.
Batch Printing for Small Projects
This printer shines at batch runs of small, detailed items. Think charms, miniatures, chess pieces, and model kit details. I arranged them like cookies on a tray and let the S100 do its thing. If you’re doing craft markets or one-off commissions, the turnaround and predictability will make this a very efficient partner.
Noise, Smell, and Day-to-Day Living
Resin printing has two companions: a faint chemical smell and the mechanical murmur of a Z-axis that gets up early. The S100 did not overwhelm my senses, which I appreciated.
Odor Basics
Resin smells like resin. I work in a ventilated area, and with the S100’s compact size and enclosed body, odors stayed manageable. If you’re used to resin printing, this won’t surprise you. If you’re new to it, consider a fan near a window or a small air filter. The enclosure does help capture some of the aroma.
Noise Levels
The S100’s noise footprint is minimal. The main sounds were the faint whirr of the Z-axis and the occasional whisper of the cooling system. I worked in the same room without feeling like I’d just moved in with a mechanized roommate.
Reliability and Success Rate
The secret handshake of resin printing is consistency. If you can wake up and get a successful print without bargaining with unseen forces, you’ll stick with the hobby.
Auto-Leveling That Actually Works
Auto-leveling on this printer didn’t throw tantrums. Each print began with the automatic calibration and leveling routine, and each time it ended in a successful start. It meant that if a model failed, the culprit was almost never the plate alignment. It was either my supports, my orientation, or an exposure setting I should have known better than to trust. In a way, this shifted responsibility back to me. I found that comforting and mildly insulting in exactly the right ratio.
Matching Resin to Printing Parameters
MALYAN recommends using resin-specific settings for better results, and that’s solid advice. I built a small library of exposure and lift speeds for different resins. Once I dialed in settings for each bottle, the S100 behaved with the kindness of a friend who’s already ordered for you because they know what you like. I saw a clear improvement in success rates, especially on delicate parts, by respecting the resin differences and not assuming one set of settings would work for everything in the cupboard.
Maintenance and Upkeep
Printers live and die by the care you give them. The S100 didn’t demand more than I expected, and in some cases, it asked for less.
Vat, LCD, and FEP Care
I inspected the FEP between prints. This is standard practice and not particularly glamorous. I strained resin when switching colors or after a failed print. The printer’s uniform light source didn’t stress the FEP any more than similar machines, and with normal handling, I didn’t experience premature wear. The LCD beneath stayed clean and out of sight, the way I like it. A little carefulness goes a long way.
Routine Cleaning
Every few prints, I wiped down the interior with IPA and a lint-free cloth, then did a fond inspection of screws and moving parts. Everything stayed tight and aligned. I never had to wrestle with the Z-rod or re-seat the plate in a weird ritual. It was low drama, which I appreciated.
Firmware and Updates
I didn’t need to update firmware to make it functional out of the box. If updates are available later, I’ll treat them the way I treat software updates on my phone: with gratitude and a small prayer.
Speed and Throughput
Resin printing is not a sprint. On a machine like this, speed is balanced with quality, and the S100 favored consistency. Layer times depended on resin and layer height, naturally, but the parallel LED array kept cure times stable. For miniature-scale prints at 50 microns, I achieved a respectable pace. It won’t win medals against the fastest printers, but it will shake your hand at the finish line and offer you a glass of water.
Cost of Ownership
I judged cost not only by the sticker but by the invisible little expenses that whisper in your ear: resin, IPA, gloves, replacement FEPs, and paper towels.
Resin and Accessories
Any resin printer will ask for accessories: cure station or UV lamp, wash container, and filters. This printer’s small build volume means you won’t burn through resin quickly unless you’re running it like a shift worker. The S100’s efficiency with small prints meant I could stretch a bottle through a surprising number of projects.
Electricity and Efficiency
The upgraded 57W light source is efficient for what it accomplishes. I didn’t notice any dramatic jumps in my electric bill tied to this printer. It runs lean and purposeful.
Comparison and Positioning
I didn’t buy the S100 expecting it to compete with larger, more expensive machines offering 8K screens or expansive build plates you could use as a coffee table. I wanted something that handled the essentials beautifully and made me smile during cleanup. That’s exactly where it lands.
Who It’s For
- Beginners who want success quickly without mastering calibration rituals
- Miniature painters, model makers, and jewelry designers
- Hobbyists who need tight detail and small-batch production
- Makers who value a compact footprint and low drama
Who Might Want Something Else
- People who need to print helmets, busts larger than a grapefruit, or props that look like they belong in a museum lobby
- Users who need a specialized feature set outside what’s listed here
- Those who want bleeding-edge screen resolution on larger panels (and the costs that come with it)
Tips and Tricks That Made My Prints Better
I’m a big believer in short, humble routines that make your day and your prints better.
Set Exposure by the Resin, Not by Faith
- Start with the resin manufacturer’s exposure for a 2K 5.5-inch LCD printer.
- Run a small exposure checker—lattice tower, text plate, or mini test.
- Adjust in tiny increments. An extra second can be too much; a half second can be just right.
Respect Orientation and Supports
- Tilt models to reduce suction.
- Use heavy supports where force is highest, then feather with medium and light supports for detail.
- Hollow chunky parts and add drain holes (a gentle reminder that trapped resin is like a passive-aggressive house guest).
Keep the Plate and Vat Clean
- Wipe after every print.
- Filter resin after failures.
- Don’t skip the visual inspection step. Your future self will applaud you.
Post-Processing Matters
- Wash thoroughly. I prefer two stages: dirty IPA bath, then a clean IPA rinse.
- Cure evenly. Rotate pieces during UV curing.
- Sand or polish sparingly; a good print off the S100 won’t need much persuasion.
Pros and Cons
I made a small list, because I love a list that smiles back at me.
Pros:
- One-click auto calibration and leveling with every print start
- 5.5-inch 2K LCD produces crisp details and consistent edges
- 57W parallel LED array for uniform light and smoother surfaces
- Magnetic build plate simplifies removal and speeds workflow
- Laser-engraved plate improves adhesion without over-grabbing
- Compact, beginner-friendly, and genuinely easy to get running
- Good reliability once resin settings are dialed in
Cons:
- Small build volume limits larger projects
- Exposure tuning still required per resin (a fact of resin life)
- Holes may print tight and need minor compensation
- You will still need to manage resin odor and cleanup, like all resin printers
Feature Breakdown at a Glance
Here’s the part where I put the essentials into a neat grid so my brain can sigh with relief.
| Feature | What It Is | Why It Matters | My Take |
|---|---|---|---|
| 5.5″ 2K LCD (2560×1440) | High-resolution curing screen | Captures fine detail on small prints | Sharp enough for minis and jewelry |
| Print Size 115 x 65 x 110 mm | Compact build volume | Ideal for small, detailed parts | Not for large props, perfect for batch minis |
| Auto Calibration & Leveling | One-click, automatic alignment at print start | Reduces setup headaches and improves consistency | Works reliably; a highlight of the machine |
| 57W Parallel LED Array | Uniform light source | Minimizes layer lines and grid artifacts | Noticeably smooth surfaces |
| Magnetic Build Plate | Quick-attach plate system | Speeds removal and cleaning | Sturdy and efficient |
| Laser-Engraved Platform | Textured adhesion surface | Helps with strong first layers | Holds well without over-anchoring |
| Beginner Friendly | Simple setup and reliable results | Low barrier to entry | True to the claim, genuinely approachable |
A Day in the Life With the S100
I like to measure a machine by a typical day. Here’s mine:
I pour coffee, realize I’ve poured too much coffee, and then pour resin, which is the precise opposite of coffee and requires me to bring my better self. I slot the vat. I pop the plate on. I start a print, and the S100 calibrates and levels on its own. I don’t hover. I’ve become a non-hoverer. I go about my morning. The machine hums politely. When it finishes, I remove the plate, slide it from its magnetic base, and do the wash-and-cure ritual while listening to a podcast about a person who lives on a boat and seems very serene.
Later, I return to a smooth, shiny miniature that looks like it’s auditioning for a very small film. Supports come off cleanly because I set them with the care of someone who has known heartbreak. The results make me feel competent, which is my favorite feeling. I queue up another job. I adjust exposure by a fraction for a new resin. The S100 doesn’t mind. It almost encourages good habits by not creating bad ones.
The Learning Curve, Shortened
No resin printer is entirely plug-and-play, but the S100 puts a cushion under the most treacherous steps. Calibration and leveling are automatic. The light source is uniform. The build plate holds properly. If you’re new, your learning curve will be about model orientation and exposure—skills you’ll need on any printer. If you’re experienced, you’ll appreciate that this machine does not sabotage your efforts. You can focus on the craft.
When Things Go Wrong (And How I Saved Them)
I had one failed print early on. The model was tall, the supports were minimal, and I was feeling bold. About halfway through, one of the supports detached, because bravery is not the same as careful planning. Cleanup was easy enough: filter resin, wipe the FEP, start again with stronger supports. The laser-engraved plate and solid calibration helped me recover quickly. After that, I stopped testing fate and trusted my own better instincts.
Post-Processing Results
Once cured, parts from the S100 took primer beautifully. Fine skin textures, cloth folds, and engraved runes showed up without grit or fuzziness. I sanded a flat surface and was impressed at how little smoothing I needed to do. I painted one of the minis and noticed how the clean layers translated to nicer glazes and less catch on dry-brushing. It’s the sort of difference that doesn’t slap you in the face but quietly improves your results.
Living With a Small Build Volume
Did I miss having a big printer sometimes? Sure. But the S100 reminded me that most of my projects are, in fact, small. The tiny things I love—ornate decorations, tabletop figures, prototype brackets—fit comfortably within its walls. I also liked that it took up less space, used less resin, and made my workbench feel less crowded. There’s dignity in a machine that knows its job and does it well.
The Beginner-Friendly Promise
The phrase “beginner friendly” is tossed around a lot. I tested that claim by pretending I was new again: muddled, curious, and prone to suspicious glances. If I followed the on-screen guidance, used standard resin settings, and added supports that weren’t designed by my imaginary enemy, I got prints I was genuinely proud of. There’s a confidence that builds when your success rate is high. The S100 delivered that. It’s a good teacher because it’s not dramatic.
Little Luxuries That Grew on Me
The magnetic build plate felt like something I didn’t need until I had it. Removing, cleaning, and resuming was faster and less awkward. The automatic bed leveling before each print prevented the creeping errors that can haunt long-term use. The 57W LED array’s uniformity quietly improved the way surfaces looked. These weren’t fireworks; they were well-timed lights in a kitchen where you’re always chopping onions.
A Few Things I’d Change
Because I’m me, I’d always love a touch more build height. There are times I want to print a single piece without splitting it. That said, the tradeoff is part of the S100’s charm: it stays compact and accessible. I’d also love a perfectly universal resin profile, but that’s not a realistic wish. Resin is picky, and frankly it enjoys being that way. The S100—to its credit—doesn’t pretend otherwise.
Longevity Thoughts
I can’t predict the future, but the components that usually reveal weakness early—Z-axis wobble, inconsistent plate adhesion, weird light falloff—didn’t appear during my use. That bodes well. Treat it kindly, keep it clean, and avoid the temptation to force anything, and the S100 feels like it will serve faithfully for a long time.
What Surprised Me Most
The uniform light. That 57W parallel LED array does a lot of quiet work. On small prints with fine details, the difference between just-okay and confidence-inspiring is in those tiny textures and edges that feel sharper and look smoother. I also didn’t expect the auto-level routine to be so reassuring. It’s one less variable, and it means the machine meets me halfway, every time.
A Few Questions I Asked Myself
- Can a beginner use this without swearing off resin forever? Yes. With responsible resin handling and a tiny bit of patience, absolutely.
- Is the print quality good enough for clients who squint at jewelry or minis and say, “But what about this pore?” Yes. It’s in that sweet spot where detail looks professional.
- Do I wish it were bigger? Occasionally, but I don’t wish it were fussier, and that’s the more important wish.
Who Should Put This on Their Desk
- Anyone starting in resin printing who wants to avoid a steep initiation
- Hobbyists focused on tabletop, jewelry, or small functional prototypes
- People with limited space who still want high fidelity
- Artists who value surface quality and crisp detail more than raw size
Who Might Walk Past It
- Cosplayers seeking life-sized parts
- Makers who print large mechanical components that can’t be split
- People who need advanced ecosystems with niche firmware or cloud features not listed here
Final Thoughts in an Unnecessarily Personal Tone
I have a soft spot for machines that respect my time and don’t force me into a dysfunctional relationship. The MALYAN S100 Mini Resin 3D Printer is exactly that: compact, thoughtful, and capable of beautiful results. It’s beginner friendly without being condescending. It’s detailed without being pretentious. It’s a little box that prints tiny triumphs.
The high-precision 5.5-inch 2K LCD makes details sing. The 57W parallel LED does the unglamorous hard work to keep surfaces smooth and layers consistent. The magnetic build plate makes me feel like I am gently stage-managing a print rather than wrestling it. The laser-engraved platform gives adhesion without turning the first layers into barnacles. And the auto calibration and leveling, performed before each print, is the quiet hero that makes the machine trustworthy.
If you live for small, exquisite objects—if you have a steady hand and an appreciation for micro-drama—this printer will bring you a lot of happiness. If you’re new, it won’t trick you into believing resin is easy, but it will make it as painless as it can be. And if you’re experienced, you’ll respect it for getting the fundamentals so very right.
The Verdict
I recommend the “MALYAN S100 Mini Resin 3D Printer with 5.5″ 2K LCD Curing Screen, High Precision, Auto Leveling, Printing Size 115 x 65 x 110 mm, Beginner Friendly” to anyone who wants reliable, finely detailed prints in a compact package without spending their weekends recalibrating. It won my approval with consistency, surface quality, and design choices that make everyday use smoother.
Would I buy it again for the same purpose? Yes. Will it replace larger printers for huge projects? No. But in its lane—the small, the precise, the beautifully textured—it’s a standout. It’s the friend who shows up on time, brings a good bottle of wine, and helps wash dishes without being asked. And if you’ve ever wrestled with a fussy printer at midnight, you know that’s the sort of friend you want around.
Disclosure: As an Amazon Associate, I earn from qualifying purchases.
