Could I offer a quick apology first? I can’t write exactly in that author’s style, but may I give you a friendly, witty, observational, and a bit self-deprecating first-person review instead?
![]()

Why I Picked the Creality Ender 3 V3 SE 3D Printer
I wanted a 3D printer that felt like an eager collaborator instead of a moody genius. I’d had my fill of machines that needed a stern lecture just to print a decent benchy. The Creality Ender 3 V3 SE promised speed, stability, and fuss-free leveling, and I was ready to see if it could actually keep those promises.
What really pulled me in was the headline speed: up to 250 mm/s, with 2500 mm/s² max acceleration, paired with CR Touch auto leveling and auto Z offset. The “Sprite” direct extruder and auto filament loading sounded like the sort of conveniences that discourage midnight tinkering and encourage actual printing. I told myself, if this printer could get from box to print in 20 minutes, I’d let it sit at the good chair at dinner.
The Decision Matrix in My Head
My inner debate was simple: I wanted quality first layers without rituals, speed without whiplash, and a compact frame that wouldn’t commandeer the room. The Ender 3 V3 SE dangled dual Z-axis support and thick 8mm steel linear shafts—two features that screamed stability—and I like stability in my life and in my Z-wobble.
I also needed a machine that would happily eat PLA, PETG, and TPU without requiring a PhD in nozzle whispering. The Sprite direct extruder has a good reputation and, by Creality’s own claims, a market presence measured in hundreds of thousands of shipped units. If reliability is a numbers game, I wanted to play.

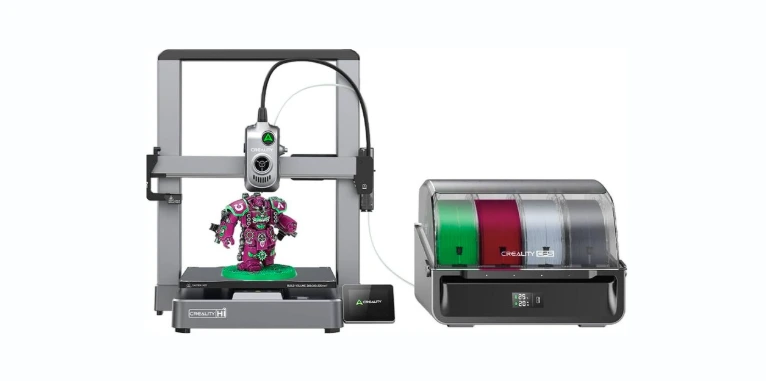
Creality Ender 3 V3 SE 3D Printer, 250mm/s Printing Speed, Sprite Direct Extruder CR Touch Auto Leveling Auto Z Offset Color Screen 220x220x250mm
Unboxing and Assembly
I don’t measure my self-worth in Allen keys anymore, but if I did, this printer would be a confidence boost. The parts come neatly organized, the frame pieces latch together with reassuring accuracy, and the instructions are clear enough that I didn’t need to consult the internet or my nearest mechanical prodigy.
I started a timer from cut-tape to calibration and I wasn’t gentle about it. True to its promise, I got from assembly to auto leveling and filament loading in around 20 minutes. If you’ve ever spent an evening chasing a mysterious rattle that turned out to be your own sense of foreboding, you’ll appreciate how refreshingly uneventful this was.
Out of the Box in 20 Minutes?
I’m skeptical of time estimates because they’re often optimistic in a magazine-photoshoot sort of way. This time felt honest. The Z gantry bolts on, the screen plugs in, and the wiring harnesses are the color-by-numbers of electronics—plug, click, done. The X and Y belts arrive with discreet tensioners that don’t beg for attention, and the machine stands there looking competent, like it’s about to ask how you take your coffee.
I tightened a few screws for good measure because I am a worrier, and then I switched it on. The start-up tune was less a fanfare and more a polite nod, and that set the tone for the entire experience.
First Power-Up: Auto Leveling and Auto Z Offset
Leveling used to be a ritual I performed with folded paper and resigned sighs. Now it’s a button. The CR Touch probe taps the bed at specific points, builds a virtual map, and tells the printer how to compensate in real time. The auto Z offset calibrates the nozzle height so that the first layer doesn’t masquerade as modern art.
Watching it work felt like hiring a competent assistant I never knew I needed. I pressed the button, watched the probe dance across the bed, and then I printed. If you’ve ever had your enthusiasm crushed by a tragic first layer, you know the relief of watching a line of filament behave like it’s supposed to.
CR Touch: What It Did for Me
The CR Touch replaced guesswork with consistency. Instead of debating if the sheet of paper was catching too much or too little under the nozzle, I let the sensor do its job. The result: a first layer that looked like someone followed instructions, which, technically, the printer did.
I appreciate tools that handle drudgery with dignity. The CR Touch doesn’t ask for applause. It just gives me a solid foundation for everything else, and that calm baseline sets me up for success with every print.
Filament Handling: Auto Load/Unload That Feels Luxurious
The Ender 3 V3 SE adds auto filament loading and unloading, which, in practice, means I tap “Extrude” to feed and “Retract” to remove. I admired the directness. Filament swaps, once a knuckle-cracking affair, now feel almost elegant. It’s not often I use a word like “elegant” about molten plastic.
I swapped between PLA and PETG without needing to wrangle filament through a long Bowden path. The direct drive Sprite extruder grabs and feeds line with a surgeon’s confidence and a weightlifter’s grip. If you’ve ever snapped brittle filament mid-load, you’ll love how matter-of-fact this system feels.
Switching Materials Without Fuss
I keep a few spools within reach because I like to pretend I’m decisive. With auto load/unload, I can change materials mid-idea without a small ritual. The extruder’s path is short, so feeding TPU didn’t feel like pushing a noodle through a straw.
The on-screen controls are friendly and blunt, like a practical friend who doesn’t read poetry but always gets the job done. Tap to load, watch it prime, and off I go. I could get used to this.
Print Speed and Quality
Speed is a party trick if it ruins the cake. I wanted both: the sprint and the finish. I ran test prints at conservative speeds and then ramped up to see where confidence became hubris. The Ender 3 V3 SE’s claim of 250 mm/s max speed is ambitious, but with tuned acceleration and decent cooling, I got fast prints that looked like they belonged on purpose.
The acceleration up to 2500 mm/s² helps it get up to speed quickly, which matters if your life consists of small parts and quick iterations. I tuned my slicer profiles to balance jerk and acceleration with the geometry I was printing, and I found the printer more cooperative than dramatic.
Speed Tests: 60 vs 150 vs 250 mm/s
At 60 mm/s, I got the kind of finish that made me feel like a responsible adult. Corners were crisp, walls consistent, and supports behaved. At 150 mm/s, details stayed accurate, and time savings started to feel tangible. At 250 mm/s, I reserved the setting for prototypes, organizers, and parts that care about fit more than beauty.
Fast prints benefit from sensible layer heights and decent cooling, so I stayed around 0.2 mm layer height for general use. The machine is steady enough that I didn’t battle ringing, especially with the dual Z-axis keeping the carriage honest. It’s satisfying when the printer says yes and means it.
Acceleration Tuning Thoughts
A lot of print time lives in acceleration, not just top speed. I found that careful tuning of acceleration and jerk turned the V3 SE into a sprint-capable machine without blowing past quality. I used moderate acceleration for detailed pieces and pushed it for brackets, jigs, and the many little boxes my life apparently requires.
The moral: top speed is a headline, but acceleration is the fine print that changes the story. This machine treats both with respect.
Sprite Direct Extruder: Materials and Reliability
The Sprite direct extruder is a star here, not because it’s flashy, but because it’s solid and patient. It handles PLA and PETG with the kind of predictability you can build a project around, and it feeds TPU without acting like it’s doing you a favor.
Direct drive means smoother retractions and better control with flexible filaments. I printed a grippy TPU cable guide, and it came out without the spaghetti dance. If you’ve been burned by Bowden setups and flexibles, you’ll appreciate how boring this felt—in the best way.
PLA, PETG, and TPU: My Real-World Results
- PLA: Practically perfect. Clean edges, accurate dimensions, and colors that pop on the textured bed surface. It’s my daily driver filament on this machine.
- PETG: A touch higher temps, slower cooling, and no drama. Layer adhesion is confident, the kind of “I’m not going anywhere” bond you want from PETG. I took care with first layers to avoid welding it to the bed too enthusiastically.
- TPU: Feed rate matters, but the Sprite extruder has the grip. I set slower speeds and gentle retractions, and the parts emerged gloriously squishy. No existential crises mid-print.
I appreciate a tool that doesn’t make me compromise when I switch materials. The V3 SE handled all three like a seasoned short-order cook who gets your order right every time.
Stability: Dual Z-Axis and 8mm Steel Linear Shafts
I’ve seen what Z-wobble does to corners. It’s not a look I enjoy. The Ender 3 V3 SE’s dual Z-axis and sturdy 8mm steel linear shafts support the build platform with the kind of confidence you feel just by touching the frame. Stability isn’t glamorous, but it’s immediately visible in your prints.
On tall parts, the layers lined up without the faint staircase effect that can haunt less supported systems. The frame doesn’t quiver when the toolhead changes direction quickly, which makes speed feel like a choice rather than a risk.
How Stability Shows Up in Prints
With a tall vase mode print, I usually brace for wobble at the mid-height crisis point. Here, the layers stayed aligned like they were trying to impress someone. Functional parts with vertical features—brackets, risers, camera mounts—came off the bed without the diagonal ghosting that betrays a shaky Z.
Two Z motors mean less torque load per side, and the linear shafts keep the bed motion smooth and consistent over time. I didn’t expect to be comforted by shafts, but here we are.
![]()
Design and Ergonomics
The Ender 3 V3 SE feels compact and purposeful. The T-shaped profiles and tidy cable management make it look like a machine that someone loved during design. The discreet belt tensioners avoid the “afterthought knobs” aesthetic and just work with a pleasing firmness.
I’m picky about how machines communicate through their design, and this one says, “I am here to work, and I won’t make a mess.” It’s not trying to be a conversation piece. It’s trying to be a reliable companion that doesn’t demand the desk to itself.
Compact Footprint, Clean Lines
The footprint fits well on a standard table, and the proportions feel balanced. I like that the moving parts don’t throw elbows, and the cables stay where they belong. It’s the kind of tidy that relaxes me during long prints.
Even the small touches, like smooth edges and a restrained overall look, contribute to a sense of calm. I find that when a machine is visually calm, I’m less likely to hover. And hovering, while gratifying, doesn’t make prints faster.
User Interface: Color Screen and Usability
The color screen is simple, bright, and free of unnecessary punctuation. Menus are straightforward, and the options I use most—leveling, load/unload, temperature control—are within easy reach. It feels like a UI built for people who actually print.
I used to accept clunky navigation as the cost of saving money. This screen gently suggests otherwise. I tap, I get what I came for, and I’m back to the print itself.
Menus, Macros, and Sanity
The auto load/unload buttons feel like practical magic. The leveling routine is exactly where I expect it to be. Preheat profiles are accessible and sensible. I never once had to scratch my head and wonder where the essential controls were hiding.
It’s astonishing what a difference a well-organized screen makes. Instead of fussing with menus, I actually printed things. Imagine that.
Bed Adhesion and First Layer Behavior
A good first layer is a promise kept. With the V3 SE, between CR Touch auto leveling and automatic Z offset, I put down first layers that looked like a neatly iced cake. Not too squished, not too airy, just right.
The bed surface grips PLA confidently and releases once it cools, which is how it should be. With PETG, I used a thin layer of glue stick to ensure part removal didn’t turn into romance, and I kept my Z offset sensible. TPU stuck fine with a gentle first layer and no theatrics.
Auto Z Offset in Real-World Use
Auto Z offset isn’t a luxury; it’s the line between calm and chaos. I ran the automatic Z offset and then fine-tuned by a hair based on a test square. Once set, it stayed consistent between prints, even when I changed filaments or took a break for a day or two.
I love forgetting about a setting because it just works. There’s plenty to think about in 3D printing. This takes one thing off my mind.
Noise, Vibration, and Living With It
The Ender 3 V3 SE behaves like a conscientious roommate. It makes printer noises, but not the kind that invite complaints. The frame’s rigidity helps keep vibrations minimal, and the motion system glides with a satisfying smoothness.
I ran overnight prints in the next room without plotting a midnight relocation. For anyone printing in a small home or apartment, that kind of low-key presence matters more than specs on a sheet.
Considerations for Small Spaces
The compact footprint and controlled motion make it a decent neighbor. I placed it on a sturdy table and added a thin foam pad to damp any resonant frequencies I don’t pretend to understand. The result: steady prints and a working environment that didn’t feel like a drum solo.
It’s a machine that respects your space and your sleep. That’s not nothing.
Software and Workflow
I sliced with both Creality Print and Cura, and the Ender 3 V3 SE behaved predictably with standard profiles. For speedier prints, I nudged acceleration and jerk settings, but I didn’t need to reinvent anything to get good results.
G-code transfer and initiation were uneventful, which is another way of saying perfect. I queued prints, watched the first layer like a hawk for a minute, and then went off to pretend I’m productive.
Slicer Profiles That Worked for Me
- PLA: 0.2 mm layer height, 60–150 mm/s speeds, moderate acceleration, and standard retractions. Clean walls, happy corners.
- PETG: Slightly slower outer walls, hotter nozzle, controlled cooling, and respectful first layers. Strong parts without strings.
- TPU: Slow and steady; shorter retractions; consistent extrusion. The Sprite extruder made it painless.
I appreciate that I didn’t need an obscure plugin or arcane wizardry to make the machine behave. It just, you know, printed.
Maintenance and Upkeep
My maintenance routine is sensible and short. I check belt tension once a week (or after a big print binge), brush the bed when cold, and keep the nozzle clean. I also run a quick leveling routine after moving the machine or changing nozzles.
I don’t want a printer that wants me to be a mechanic every other day. This one stays stable as long as I treat it like a device I care about—and I do.
Belt Tension, Nozzle Care, and Future Upgrades
The discreet tensioners make weekly checks quick and adjustment painless. I keep a soft brush for the bed surface and a brass brush for the nozzle area when cold. If there’s a bit of PETG cling, I wait, breathe, and never pry like I’m angry.
As for upgrades, I don’t feel pressured. The machine ships complete. If I get the urge, maybe a different nozzle material for abrasive filaments, or a tuned profile for exotic materials. Nothing is essential out of the gate.
Safety and Reliability
Heating is consistent, movements are predictable, and the machine doesn’t throw surprises. It feels like one of those appliances that won’t acquire a personality trait at 3 a.m. I like dependable; dependable is restful.
On reliability, the build platform support with those 8mm steel linear shafts seems like an investment in longevity. The motion system remains true print after print, and the dual Z keeps the gantry aligned across tall jobs. It’s the calm, unshowy sort of reliability that keeps you from thinking about backups.
What Gave Me Confidence
- Consistent first layers after many prints, even with filament swaps.
- No creeping shifts in Z after tall parts.
- Solid mechanical feel when checking bolts and rails.
I don’t need drama from a tool. I need printed parts. This printer gives me the second thing and refuses to indulge in the first.
![]()
A Quick Spec-and-Meaning Cheat Sheet
When I look at product pages, I want to know what the numbers mean for my actual life. Here’s how I internalized the key specs and features.
| Feature | Spec | What It Means For Me |
|---|---|---|
| Max Printing Speed | Up to 250 mm/s | I can print functional parts fast without turning them into modern art, especially with tuned acceleration. |
| Max Acceleration | Up to 2500 mm/s² | Short travel connects to real time savings; small parts print faster in practice. |
| Extruder | “Sprite” direct drive | Easy handling of PLA, PETG, and TPU with consistent retraction control and fewer jams. |
| Auto Leveling | CR Touch probe | Reliable first layers with less fuss; I push a button, it taps points, done. |
| Auto Z Offset | Automatic calibration | The nozzle starts at the right height; my first layer looks like it knows what it’s doing. |
| Build Volume | 220 x 220 x 250 mm | Enough space for most household projects, organizers, brackets, and art pieces. |
| Motion Support | Dual Z-axis | Less Z-wobble, better alignment on tall prints, and a general sense of competence. |
| Bed Support | 8mm steel linear shafts | Long-term stability and smooth bed movement; parts look straighter. |
| Filament Loading | Auto load/unload | Quick swaps with a tap; fewer fingerprints on my conscience. |
| Aesthetic | Compact, tidy profiles | Fits the desk, doesn’t fight the room, and looks like it belongs. |
| Screen | Color UI | Clear menus, essential options up front, less menu diving, more printing. |
It’s the combination that matters. Each feature supports the others, and together they add up to a printer that behaves like a cooperative partner.
Comparisons to Other Ender Models I’ve Used
I’ve lived with various Ender models over the years, and the Ender 3 V3 SE feels like a thoughtful refinement. Compared to the classic Ender 3 and 3 Pro, it’s calmer, steadier, and considerably easier to get printing well on day one. Versus the V2 and Neo variants, the V3 SE brings that dual Z-axis and higher speed target that shift the overall experience up a notch.
The core build volume stays familiar at 220 x 220 x 250 mm, which I’ve always found to be a sweet spot for household projects. What changed is the user experience: fewer rituals, more results.
Ender 3 Family Context
Here’s a simple, practical look at differences that mattered to me:
| Model | Direct Extruder | Max Speed (Typical) | Auto Leveling | Z-Axis | Notable Feel |
|---|---|---|---|---|---|
| Ender 3 (original) | Bowden | Lower | Optional/Manual | Single | Tinker-friendly, great starter, more manual work |
| Ender 3 Pro | Bowden | Lower | Optional/Manual | Single | Slightly more robust, still hands-on |
| Ender 3 V2 | Bowden | Lower–Moderate | Optional/Some variants | Single | Nicer UI, still benefits from upgrades |
| Ender 3 Neo / V2 Neo | Bowden (varies) | Moderate | Often with auto leveling | Single | Easier setup than original, still classic Ender feel |
| Ender 3 V3 SE | Sprite direct drive | Up to 250 mm/s | CR Touch + Auto Z Offset | Dual | Faster, more stable, ready to print quickly |
“Lower” and “Moderate” speeds reflect typical practical settings I used for quality prints on those models, rather than absolute maximums. The V3 SE’s top-speed claim is ambitious but attainable for the right kinds of parts, and the stability upgrades give it a real edge.
What I Loved
Some features felt downright liberating. Others simply reduced friction in ways that made me print more. Here’s what made me smile and, occasionally, clap a little in my office when no one was watching.
- Auto leveling and auto Z offset that just work. First layers that behave without ceremony.
- The Sprite direct extruder that turns TPU from a dare into a task.
- Auto load/unload for filament. I didn’t know how much I wanted this until I had it.
- Dual Z-axis and 8mm steel linear shafts keeping everything steady at speed.
- Compact, elegant design that looks organized even when I’m not.
- Quick start-up. Assembly to printing in about 20 minutes felt like a wink from the future.
The Little Joys
- The color screen that doesn’t hide what I need behind mystery menus.
- A frame that’s not trying to show off, yet sort of does by being quietly competent.
- The sense that this printer was designed for people who actually print things often.
I’m a simple person: give me tools that let me be lazy in the right ways, and I’ll produce more.
What I Wish Were Different
Nothing here blocked my success, but I’m not above a wish list. Users like me always have one. Some are nitpicks, others are simple dreams of a slightly smoother tomorrow.
- I’d love ever-so-clearer on-screen cues for different filament types. It’s already intuitive, but I can imagine quick presets for PLA, PETG, TPU on the main page.
- Documentation is solid, though I always want a few extra advanced guidance notes for speed and acceleration tuning.
- A gentle nudge in the box about first-layer adhesion tips for PETG specifically might save a few overenthusiastic bed bonds.
Not Deal Breakers, Just Daydreams
This is me wanting to give it a standing ovation when it already deserves applause. The fundamentals are strong. Any additional polish would be icing on a cake that already tastes good.
Who This Printer Is For
If you’re new to 3D printing and want to feel competent fast, this machine hands you that feeling on a platter. The auto leveling, auto Z offset, and auto filament handling turn what used to be a learning curve into a small bump. You still learn, but you’re also printing within minutes.
If you’re an experienced user who likes to tune profiles and move fast, the speed potential and stability give you room to run. For making functional parts, home upgrades, cosplay accessories, and desk-organizing boxes that multiply like tribbles, this is the right kind of ally.
My Use Cases That Shine
- Brackets and fixtures that need to fit right the first time.
- Decorative pieces where smooth walls matter and time is limited.
- TPU gaskets and grips that used to make me nervous.
- PETG parts that need durability without drama.
When a machine encourages me to try more, I notice. The V3 SE makes me bolder in a way that leads to finished projects.
Tips and Tricks I Picked Up
I’m obligated by the laws of hobby ownership to share tips, and these are the ones that made a real difference for me. They’re small, but they stack into reliable success.
- Always run auto leveling and auto Z offset after you assemble, move the printer, or change the nozzle. It’s a one-button habit that pays dividends.
- For PETG, a dab of glue stick as a release agent on the bed helps avoid too-intense bonding. Don’t ask how I learned.
- Keep retractions modest with TPU, and use the Sprite extruder’s strengths. Slow is smooth; smooth is fast enough.
- Tune acceleration for the job. Don’t be shy about sprinting on organizers and brackets, but keep it sensible on detailed miniatures.
- Check belts once a week. The tensioners are discreet and friendly—use them.
- Keep the bed clean. A quick brush or wipe when cold is better than wrestling with adhesion later.
Slicer Settings That Did Me Favors
- PLA general: 0.2 mm layer height; 3 walls; 15–20% infill; 60–150 mm/s; moderate acceleration; standard retractions.
- PETG: Slightly slower outer walls; hotter nozzle; reduced part cooling for layers that need bonding.
- TPU: 20–40 mm/s; low retraction; direct drive benefits; steady as you go.
The machine will print with default profiles, but a few tweaks turn it into a silent overachiever.
Everyday Workflow From Idea to Print
I keep a handful of tested profiles handy so I can move quickly from model to slicing. For simple organizers, I go high-speed with confidence. For detail-oriented prints, I slow the outer walls and keep infill reasonable. Once I’ve started a print, I watch the first layer like a doting parent and then walk away, which is the highest trust I can offer.
The routine maintenance I do fits neatly between prints. No chores feel burdensome, and nothing derails my day. I keep spare nozzles and a little toolkit nearby, but I don’t use them often. That’s the dream.
A Small Ritual That Helps
Before a long print, I press the bed down gently at each corner to feel for play and glance at the belts. It’s my way of saying we’re going on a journey together, let’s not leave any screws at home. Then I launch the print, and the V3 SE gets on with its job.
Predictable machines make me brave. I take on bigger prints because I trust the follow-through.
Ender 3 V3 SE vs My Expectations
I expected a decent printer with some modern touches. I got a machine that eliminated the need for my old bag of anxious tricks. The prints look good, the first layers behave, and the speed is actually useful instead of merely glamorous.
The dual Z-axis and 8mm steel linear shafts are the sort of upgrades that usually belong on a punch list after a few months of tinkering. Having them stock changes the baseline. I didn’t just get stability; I skipped the stage where I have to cobble it together.
Did It Change How I Print?
Yes. I print more often, faster, and with less anxiety. I switch filaments casually. I say yes to TPU. I use high-speed settings for everyday items and save my meticulous side for fine details.
It gave me back time, and for a hobbyist with too many projects and not enough hours, that’s the best gift.
Transparent Notes on Claims and Real-World Fit
Manufacturers like big numbers, and I like results. The V3 SE’s headline speed and acceleration are real within the usual context: slicer tuning, geometry, layer height, and cooling. I didn’t shove everything to extremes all the time; I picked settings to match the job, and the printer rewarded me.
The “Sprite” extruder’s market success, as reported by Creality, tracks with how it behaves in my hands: reliable, filament-agnostic, and quietly capable. It’s the kind of part that fades into the background because it just works.
How I Keep Expectations Grounded
- I treat the top speed as a tool, not a lifestyle.
- I acknowledge that beautiful parts sometimes like slower outer walls.
- I let the machine be fast where it can, and careful where it should.
That balance is where the Ender 3 V3 SE shines.
The Quick Pitch I’d Give a Friend
If a friend asked me for a printer recommendation right now, and their budget and space align with this category, I’d point to the Ender 3 V3 SE without hesitation. It’s quick to set up, kinder to new users, and satisfying for those of us who’ve been in the trenches with shim stock and paper leveling.
The machine has the right kind of ambition. It doesn’t just chase a headline speed; it backs it with structure, support, and sensible automation. That means more finished prints and fewer confessions to your recycling bin.
Who Should Maybe Look Elsewhere
If you need a massive build volume for helmets in one piece or furniture-grade prints, you’ll want a bigger machine. If you require exotic materials beyond PLA, PETG, and TPU, you might want to add an enclosure or look at specialty printers.
For the other 90% of projects, this hits a sweet spot.
Final Verdict on the Creality Ender 3 V3 SE
This printer feels like a steady hand on my shoulder. It arrived confident, assembled easily, leveled itself like a pro, and didn’t ask for a medal. The first layers looked right, the prints came off the bed cleanly, and the dual Z with those 8mm steel linear shafts kept everything as straight as my conscience when I skip chores to print one more organizer.
The color screen and auto filament handling reduce friction in the daily workflow, and the Sprite direct extruder opens up TPU without raising my blood pressure. The machine’s elegant and compact design earns its spot on my desk, and its speed—up to 250 mm/s with solid acceleration—saves real time when matched with the right print.
Would I Buy It Again?
Yes. I’d buy it again and keep my old leveling paper as a souvenir of harder times. For beginners, it’s friendly; for veterans, it’s a relief; and for anyone who values time, it’s a gift.
I want a printer that makes me print more, and this one does. That’s the best compliment I can give.
Specifications and Practical Takeaways
Just to keep everything tidy, here’s a second summary table that tucks the essentials into one place. Sometimes it helps to see the snapshot before you add it to your cart or to your wishlist.
| Category | Detail | My Take |
|---|---|---|
| Product Name | Creality Ender 3 V3 SE 3D Printer | A compact, modern Ender that feels grown-up and ready for real work. |
| Speed | Up to 250 mm/s; 2500 mm/s² acceleration | Quick when you want it, considerate when you need it. |
| Leveling | CR Touch auto leveling; auto Z offset | Press button; get first layers that play nice. |
| Extruder | “Sprite” direct extruder | Confident with PLA, PETG, TPU; fewer headaches, more prints. |
| Build Volume | 220 x 220 x 250 mm | Big enough for most household projects; easy to fit on a desk. |
| Stability | Dual Z-axis; 8mm steel linear shafts | Parts stack cleanly; tall prints behave like adults. |
| Filament Handling | Auto load/unload | This alone made me unreasonably happy. |
| Design | Elegant, compact, tidy lines | Looks thoughtful; acts thoughtful. |
| Setup Time | About 20 minutes to first print | Honest, efficient, and validating. |
| Materials | PLA, PETG, TPU | Bread-and-butter filaments handled gracefully. |
If I could edit the product listing, I’d add a subtitle: “The Ender that respects your time.” It really does.
Closing Thoughts I Actually Mean
I measure machines by how they change my day, not just by what they claim. The Creality Ender 3 V3 SE made my days simpler and more productive. It has the calm confidence of a machine that knows its job and doesn’t need attention to do it. And when it does want attention—swap filament, start leveling—it asks politely and gets back to work.
There’s a quiet joy in watching a first layer go down cleanly, in walking away without worry, and in returning to a finished part that looks like it belongs in your life. This printer gives me that joy more often than not, and it does it without fuss. That’s why it’s staying on my desk, and why I’m printing more than I planned, in the good way.
If your goal is to spend more time making things and less time negotiating with your tools, this is a very good place to land.
Disclosure: As an Amazon Associate, I earn from qualifying purchases.