Have you ever watched your 3D printer at two in the morning and thought, “Maybe we both deserve a little privacy?”


Why I Wanted an Enclosure
I live with a printer that has the personality of an eager raccoon: industrious, noisy, and astonishingly good at scattering bits of plastic exactly where I don’t want them. I wanted an enclosure not because I’m fancy, but because I was tired of chasing threadlike wisps of filament across the room and pretending the zipping print head wasn’t singing me to sleep.
I also needed consistency. Filament that curls up like a potato chip when the room gets drafty? No thank you. Resin dribbles I invariably notice only after stepping into them? Even worse. So when I saw a 3D printer enclosure that promised constant temperature, dust and noise reduction, an actual thermo-hygrometer, and a built-in LED light, I claimed it like an aunt at a church bake sale claiming the last lemon square—politely, but with unmistakable intent.
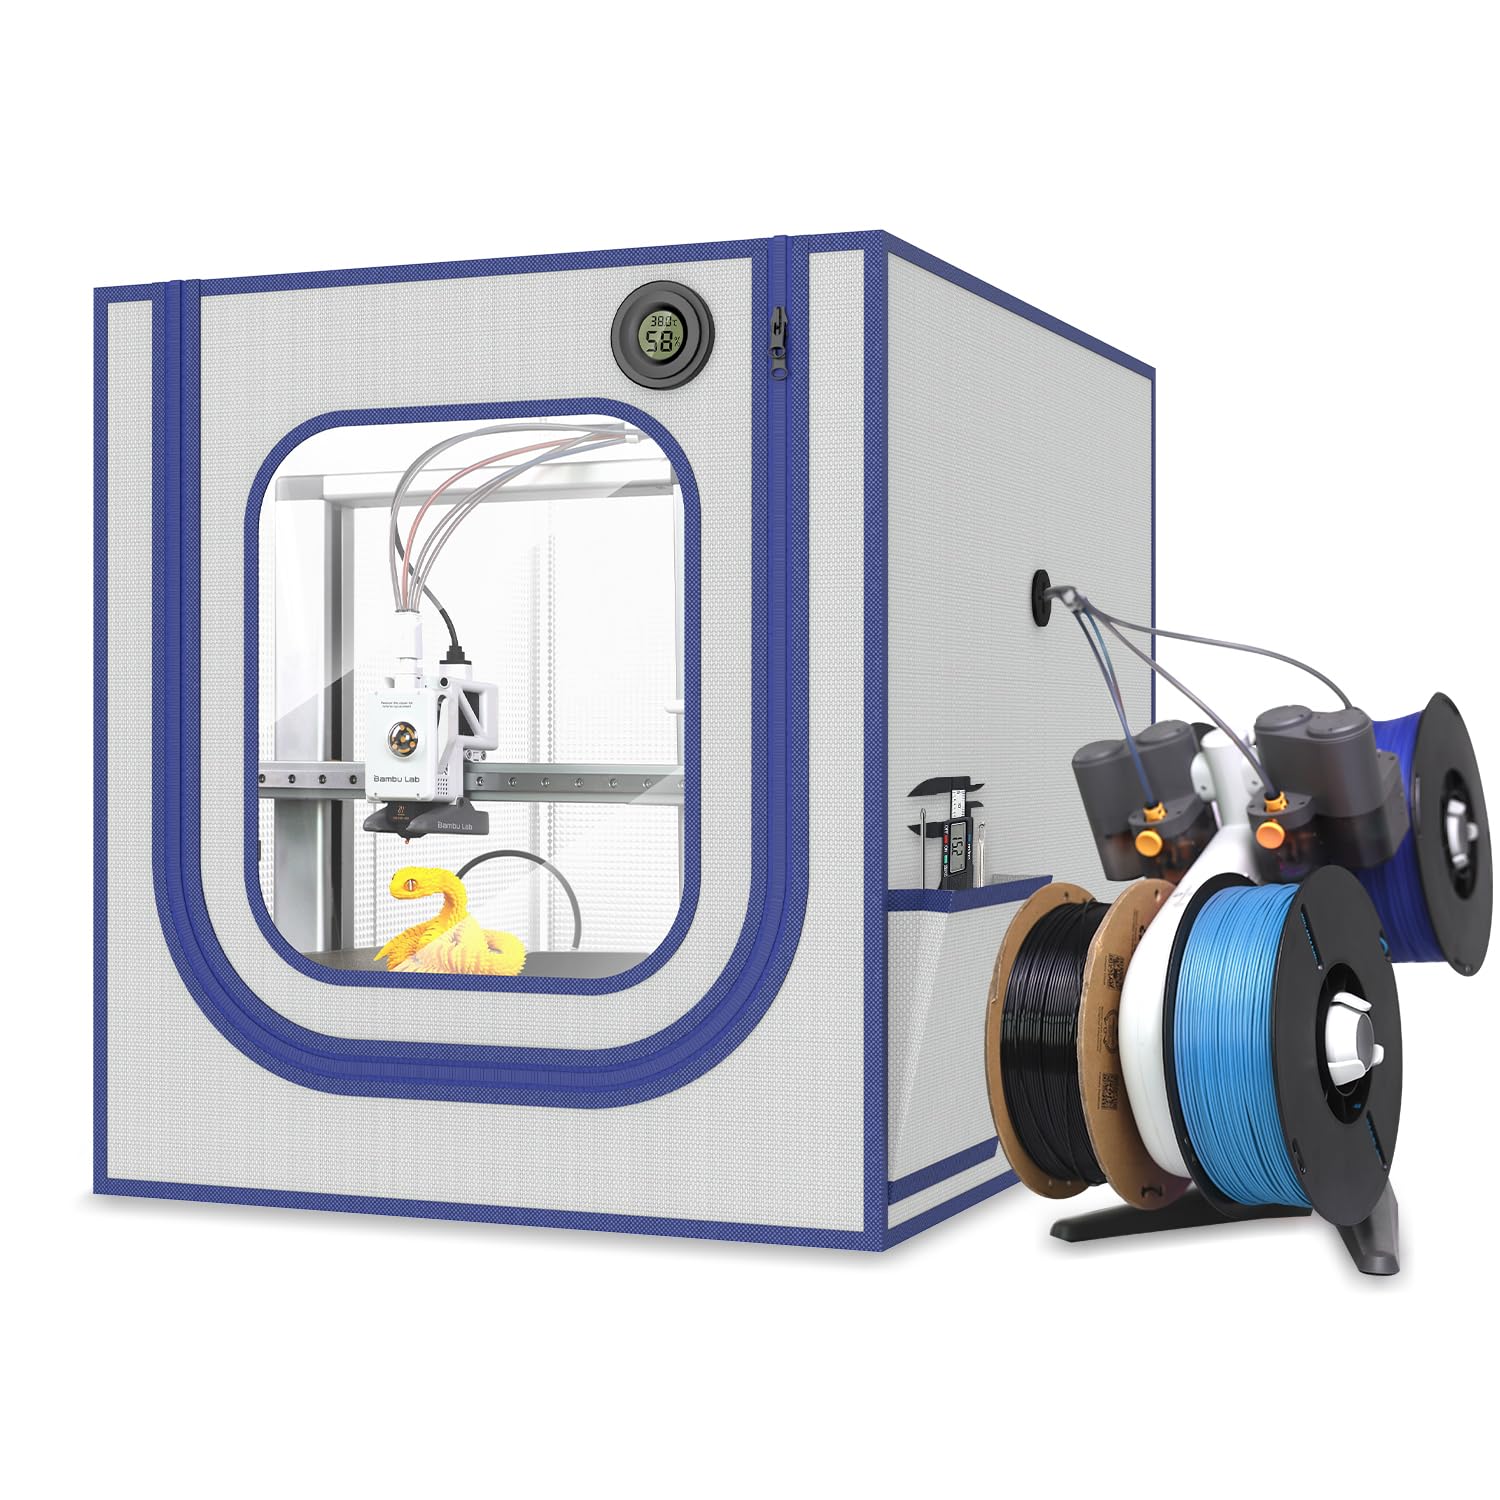
3D Printer Enclosure with LED Light, Resin Printer Enclosure with Thermo Hygrometer, 3D Printer Tent Constant Temperature, Dustproof, Noise Reduction for Bambu Lab A1, A1mini, Ender3 Series
What This 3D Printer Enclosure Promises
The product calls itself the “3D Printer Enclosure with LED Light, Resin Printer Enclosure with Thermo Hygrometer, 3D Printer Tent Constant Temperature, Dustproof, Noise Reduction for Bambu Lab A1, A1mini, Ender3 Series.” It’s a mouthful, sure, but it’s a fairly accurate description of what I’ve got sitting in my workspace now: a fabric-and-frame tent for printers that holds in warmth, keeps out dust, muffles noise a bit, and lets me keep watch through a large, clear window with the help of LED lights.
It’s one of those solutions that feels obvious once it’s set up. I didn’t realize how much I wanted to sit and watch the prints without being blasted by fan air or feeling like I was camping next to a lawn mower. Now I watch with a gentle glow of light, as though my printer is performing community theater and I’m the only person in the audience who remembered to bring snacks.
Compatibility and Size
This enclosure fits Bambu Lab A1 and A1 mini, plus Ender 3 series models (Ender 3 V2, V3, V3 Plus, V3 SE, V3 KE, S1, S1 Pro, V2 Neo) and anything smaller than the shell size. The listed shell dimensions are 21.65 x 23.62 x 26.38 inches, which is roughly 55 x 60 x 67 cm for anyone whose brain can’t render inches without a conversion.
The key is this: if your printer is smaller than those numbers, you’re likely set. I measured twice, felt confident, and only then realized measuring tapes are conspicuously optimistic about corners. It still fit, but give yourself a tiny buffer if your machine has weird protrusions like cable chains or spool holders.
Constant Temperature and Humidity
I’ve used the enclosure with ABS, ASA, and PETG. That built-in thermometer/hygrometer is a tiny square of reassurance that tells me I’m not imagining things—temperatures inside do rise and stay more constant, and humidity readings change when I open the tent too often or decide to bake a pizza mid-print, which warms the entire apartment to a questionable “Tuscan trattoria” climate.
The benefit is straightforward: fewer layers lifting at the edges, fewer cracks in tall prints, and a general feeling that I’m not at war with physics every time the weather changes. It’s like giving your printer a cardigan and asking it to keep the drama to a minimum.
Dust and Noise Reduction
Resin has a talent for getting everywhere. Filament generates dust fluff that finds odd little corners and clings. This enclosure keeps both in check. After a week, I noticed the area around the printer looked less like a snow globe of fines and fuzz, and more like an actual workspace, which felt like cheating. Noise is also reduced—more on that below—and while it doesn’t turn a stepper motor into a singing monk, it does take the edge off.
This matters for resin too. While this isn’t an air purifier, a tent that contains the mess and helps reduce airborne particles is still a step up. I’m not inhaling the same cocktail of micro-mist when I remove the build plate, and the cleanup is simpler.
LED Lights and Viewing Window
The LED light tubes inside feel like a small but crucial luxury. Even in a dim room, I can see the layers being laid and the tiny calamities as they just begin to form. The big window makes it possible to check adhesion, stringing, or micro zits without a headlamp, a mirror, and the posture of someone convincing a cat to leave the bathtub.
Being able to see is half the battle. The other half is not touching the print when I see something suspicious, which is also more likely when I can look without opening the flap.
Easy Installation
I’m not a person who reads instruction manuals so much as I haunt them like a ghost. This enclosure took me a few minutes to assemble and didn’t require interpretive dance or an advanced degree. The pieces slot together, the fabric shell goes on, and the zippers do the rest. It’s more stable than it looks, and the upgraded frame feels sturdy enough that accidental shoulder bumps won’t cause a collapse.
It’s also easy to disassemble, which means moving it to clean or rearrange the workspace is not a weekend project. The whole process took less time than printing a Benchy at a comfortable speed, which felt like a good omen.
Unboxing and First Impressions
I opened the box expecting a flurry of mystery hardware and an existential puzzle. Instead, I found a frame, fabric, LED strips, and the little thermometer/hygrometer that snapped me into “oh, I get it” mode. The material smells new but not alarming, and the stitching looked better than I expected for something that needs to be opened and closed a lot.
Even my cat liked it, and she hates new things on principle. She circled it, peered through the window, and attempted to declare squatters’ rights when I stepped away. I’m not saying this enclosure doubled as an unapproved cat tent, but I’m not not saying that either.
Setup: From Flat Pieces to a Little Studio
Once I started, the whole enclosure went together easily. It reminded me of building one of those portable clothes wardrobes, only lighter and much more forgiving. The fabric slides over the frame like an oversized hoodie, zips align where they ought to, and there’s enough structure to keep the tent square without the seams straining.
I appreciated that I didn’t need additional tools or obscure hardware. If you can assemble a chair from a big-box store without swearing loudly enough to upset your neighbors, you’ll be okay here.
Assembly Steps I Actually Followed
- I laid out the frame pieces and matched lengths without pretending I didn’t need the diagram.
- I built the base and uprights first, then added crossbars for rigidity.
- I slid the fabric over like a fitted sheet you pretend will behave and, miraculously, it did.
- I routed LED light strips inside along the top for even lighting.
- I placed the thermo-hygrometer front and center where I could glance at it.
- I fed the printer’s cables through the designed openings and zipped up the slack so it looked tidy.
The whole thing felt like a “real adult” moment: organized, calm, like I hadn’t just plugged my printer into the same power strip as my toaster. I wouldn’t do that, of course. Again.
Cable Management and Access Points
There are zippered openings that make cable routing fairly straightforward. My Bambu Lab A1 spool holder sat comfortably outside, and the filament line fed through without kinks. On the Ender 3, I mounted the filament runout sensor so the line entered at a natural angle. The enclosure fabric flexes enough to accommodate these, but not so much that it sags.
It’s a small thing, but I like that I don’t have to wrestle a power cord around a stiff edge. Everything feels intentional, which gives the enclosure a “lived-in but neat” energy I don’t usually manage on my own.
The Thermo-Hygrometer: Tiny Gadget, Big Reassurance
I’m wary of little included gadgets that make grand claims and then flake out like a squirrel, but the supplied thermometer and humidity meter did what I hoped: it gave me a readout of the interior climate that roughly matched my own meter outside the enclosure. The numbers shifted predictably with long prints, rising in temperature by a few degrees and dipping in humidity when the enclosure stayed closed.
The feedback loop makes a difference. Instead of guessing whether ABS would be happier if I kept the zipper shut and tiptoed around the room, I could see the inside temperature stabilize and make informed choices. It’s not a lab instrument, but it’s enough.
Temperature Stability with ABS/ASA Tests
ABS is picky. When the room has a draft, it sulks. In the enclosure, I got steadier layer adhesion and corners that didn’t curl like a witch’s shoes. I ran a series of tall test prints and saw fewer layer splits on ASA, which for me is the difference between finishing a project and muttering into my tea.
A difference of a few degrees inside adds up. My Ender 3’s bed reached temperature faster and didn’t shed heat as aggressively as the room cooled down. I still warmed the bed to the same number, but the enclosure meant the rest of the part had less incentive to misbehave.
Humidity and Resin Prints
Resin is sensitive to humidity over time, especially if your storage is the “shove it in a cabinet and hope for the best” school of thought. The hygrometer doesn’t change chemistry, but it reminded me that opening the enclosure too often, especially on a rainy day, makes interior humidity jump. I started staging tools inside before prints, which kept the environment more consistent.
The benefit I saw with resin wasn’t just humidity. It was containment. The tent contains minor drips and splashes, and when I open it after a print, I’m not throwing the smell across the room as much as I used to.
Sound and Smell: My Apartment Thanks Me
My printers aren’t especially loud individually, but they conspire. Add fans, steppers, and the occasional cheerful chirp, and the living space begins to hum like a minimalist electronic album. The enclosure doesn’t silence everything, but it lowers the overall noise level enough that I can work in the same room without feeling like I should start charging admission.
For resin odors, it’s a similar story. This isn’t a chemical fume hood with powered filtration, and I still practice ventilation—open windows, safe storage, and common sense. But the tent reduces the rate at which smells permeate the room. It’s the difference between “what’s that?” and “did something very specific happen in here?” which is progress.
Noise Numbers and Night Tests
I did the unscientific thing and used a phone app. Not perfect, but informative. At idle, I saw roughly a 4–6 dB drop with the enclosure zipped compared to the printer naked on the desk. Under active printing, it hovered closer to 3–5 dB, depending on the speed and model. That’s not silence, but it’s enough to soften the edges and make the sound less intrusive.
Most importantly, the quality of the sound changes. The sharper high-frequency whine from certain fans gets muffled, so what’s left is a gentle, more even hum. It’s more “white noise” and less “angry blender.”
Resin Odor and Filter Thoughts
This tent is fabric and frame, not a powered air scrubber. I still keep a small air purifier nearby and don’t use resin in an unventilated space. That said, the enclosure keeps the smell contained until I choose to open it, and if I let the prints rest a bit before unzipping, it’s much less of an event.
For me, that’s worth a lot. I’d rather open the enclosure on purpose than have the whole room smell like an art project gone rogue.
Lighting and Visibility: The Night Shift
The integrated LED lighting might be my favorite part. I didn’t know I wanted to watch prints like I was observing tide pools, but here we are. The light is crisp and evenly spread, so I can see if the first layer is doing that serene pancake thing or if it’s a mess pretending to be modern art.
When I’m printing overnight, I glance in without turning on every lamp in the apartment. It feels discreet. I’m the sort of person who checks on bread dough through the oven window and then apologizes to it for interrupting. This lets me do the 3D printing version of that.
LED Brightness and Color
The LEDs are bright enough to illuminate the whole print area without a harsh glare. They lean neutral-white, which makes it easier to see defects that might get lost in warmer lighting. If you’re a stickler for color temperature accuracy for resin color matching, you’ll still want your usual lighting for final inspection, but this is ideal for mid-print checks.
I also like that the lights don’t heat the enclosure meaningfully. I’ve used discount LED strips that get surprisingly warm. These don’t, which keeps the enclosure doing the thing it’s good at: maintaining a gentle, consistent environment.
The Window Experience
Watching prints through the big window is oddly meditative. The transparencia is large enough to view across most of the bed, which makes a difference if you’re running multiple parts. I no longer contort my neck trying to see a corner while keeping the flap half-closed like a raccoon rummaging in the pantry.
The window stayed clear longer than I expected, though I do clean it now and then. It’s a window, not an acrylic sheet, so it resists scratching better than bare plastic but still benefits from a soft cloth and not rubbing it with the nearest T-shirt.
Build Quality and Materials
There’s always a gamble with fabric shells: will it sag, distort, or age like a gently neglected tent? So far, no. The fabric feels substantial, the inner surface wipes clean, and the exterior remains taut. It’s not so rigid it could replace a cabinet, but it doesn’t need to be.
The frame is the quiet hero here. Uprights and crossbars connect with sensible joints, and once it’s together, it doesn’t wobble every time I zip or adjust a cable. I’ve gently moved it while the printer ran and it didn’t flinch, which is more than I can say for some furniture I own.
Frame and Fabric Durability
I’m rough on zippers. I pretend I’m gentle, but I zip with the energy of someone trying to beat a closable bag into submission. These zippers hold up. The tracks are smooth, and the fabric around the zipper doesn’t crumple into the teeth the way poor designs do.
As for the fabric, it’s thick enough to resist punctures from the errant tool or spool. I try not to test this, but life happens. The seams look reinforced, especially where the tension is highest, which gives me faith that repeated openings won’t unravel the works.
Zippers, Seams, and Velcro Behavior
The zipper pulls are easy to find, even in dim light. Velcro tabs keep things tidy where they’re meant to, and they haven’t turned into lint collectors. I’d still avoid sticking them to your fuzzy sweater, unless you like a quiet sequel called “I Did This To Myself.”
Seams are straight, and even after a month of regular use, I haven’t had threads pop or the fabric separate at corners. That’s the sort of thing you only notice when it goes wrong, which is how I prefer my seams to behave.

Real-World Printing Results
Between the temperature stability and the reduction in dust drift, I’ve had fewer surprise failures since using the enclosure. It isn’t magic—bad slicer settings and warped beds still exist—but it creates a zone where good settings can actually shine. That’s not a small thing.
I also discovered I check on prints less obsessively when I can see them clearly. It’s a paradox: transparency reduces compulsion. I don’t need to open the tent to soothe my anxiety if I can confirm with a glance that the skirt is laying down beautifully.
PLA and PETG Behavior
PLA is tolerant, but still benefits. I got cleaner surfaces when drafts are out of the picture. PETG, which tends to string when the room is cold and my patience is thin, behaved more consistently. I had fewer instances of brittle corners that looked tired before they left the bed.
If you’re primarily a PLA person, you might think this is overkill. I did too. Then I noticed how much less I was compensating for my inconsistent room environment. Your slicer profile can be less of a Swiss Army knife and more of a well-fitted screwdriver.
ABS/ASA Warping Before vs After
Before the enclosure, ABS curled like it was planning an escape. I hushed it with glue stick, brim, raft, and whispered promises, but it still chose violence. Inside the enclosure, I can run a simpler brim and see the corners stick with far less drama. Tall, thin walls show fewer layer splits, which means I don’t have to waste filament reprinting taller parts with lower fan speeds and awkward bracing.
ASA showed similar improvements. If you’ve been scared away from ASA because it felt like a problem child, an enclosure helps you feel like the capable adult in the room.
Resin Print Success and Mess Reduction
Printing resin inside the tent has two joys: less smell diffusion, and much easier cleanup. I keep a little mat inside where I set tools and the build plate while I stare at it like a crystal ball. Any drips stay on the mat and not on the desk or the cat, which is a relief for both of us.
Watching supports form under LED light through the window made me notice early lifting on one model I’d have missed otherwise. A quick pause saved the print, and I didn’t have to open the tent until I needed to.
Compatibility Notes
Printers are like shoes: the size written on the box is true in spirit, but your toes know the truth. Measure your machine with any attachments in mind: top-mounted spool holders, extended Z-axes, camera arms, cable chains, and the particular flair you’ve added on a restless weekend.
Bambu Lab A1 and A1 mini Fit
My A1 fits comfortably with room for the rear cables to arc, and the A1 mini sits like it rented a tiny studio apartment with a window and a lamp. The front opening makes front-loading changes easy, and spool routing is straightforward.
I ran multi-hour prints and left the enclosure closed, checking occasionally through the window. The door doesn’t snag on the A1’s front area, which was a small but meaningful relief.
Ender 3 Variants and Oddities
My Ender 3 V2 sits inside without drama. If you’ve got a tall aftermarket direct drive or a novelty fan shroud, double-check the height. With the shell’s interior height around 26.38 inches, there’s enough vertical room for most configurations. The width and depth—around 21.65 by 23.62 inches—accommodate typical Ender footprints with a bit of margin.
If your spool holder is top-mounted and tall, consider shifting it externally or to a side mount to keep the filament path smooth and the spool out of the warmest area. I prefer external spools for heat-sensitive filaments anyway.
Printers Smaller Than the Shell
Smaller printers, unsurprisingly, are a dream in here. I ran a small resin machine alongside tools and wipes, and it felt like a tidy workshop rather than a mess waiting to happen. If your printer is notably smaller, you’ll have extra space for accessories, which is always nice until you fill it with things you don’t need and pretend they’re essential.
Heat and Safety Considerations
Warmth is wonderful for prints, but printers are still electrical machines doing hot things next to other things that would prefer not to be hot. I keep reasonable gaps between the printer’s hottest components and the fabric walls, and I’m careful with cable routes so nothing rests against a heated bed or nozzle.
I also keep the enclosure on a stable surface where the frame won’t rock or drift, and I avoid stacking random heavy items on top just because it’s flat and looks like a good shelf. It’s a tent, not a trunk.
Ventilation Strategy I Use
For long prints, I zip the enclosure most of the time and crack it open during cooldown or when the room feels stuffy. If I’m running resin, I air out the space afterward. If you’re concerned about heat buildup, a low fan setting to move stagnant air around the exterior helps too. The enclosure keeps the core warm, and the room doesn’t heat up as much because the warmth stays put.
When I’m in doubt, I check the thermo-hygrometer and trust the numbers more than my belief that “it feels fine.”
Fire Safety Common Sense
I never leave heaters, printers, or anything that makes things melt without reasonable supervision. That’s not about this enclosure specifically, but about how I prefer my apartment to remain an apartment and not an art installation about consequences.
A smoke detector nearby, tidy wiring, and no loose flammable materials inside the enclosure go a long way toward making me feel like a responsible adult. It’s a low bar, but I’m stepping over it.
Maintenance
The enclosure is easy to keep clean, which is important because the first week I treated it like a new car and the second week like a tote bag. I vacuum dust around it and wipe the interior with a damp cloth when I notice residue. Fabriс takes a cleaning well as long as I don’t go at it with harsh solvents.
The transparent window attracts fingerprints, as all transparent things do. A soft cloth and a gentle cleaner keep it clear. If you’ve ever lived with glasses, you already know the drill: circular motions, no grit.
Cleaning Routine
- I keep a microfiber cloth inside for quick touch-ups after a messy print.
- Every few prints, I wipe the interior surfaces, especially the floor and lower walls where dust and resin splashes would settle.
- I check the zipper teeth for debris, because nothing tests patience like a gritty zipper.
- If I’ve been working with resin, I let any tiny specks cure before gently removing them, so I’m not smearing uncured resin around like I’m frosting a cupcake.
Keeping the Window Clear
A mixture of mild soap and water works well. I avoid alcohol on the window because it can sometimes cloud certain plastics or finishes. It also stings the pride when you realize the streaks are your own doing.
If it fogs inside from temperature differences, leaving the flap slightly open during cooldown helps. Mostly, though, it stays clear, which makes my life easier and my staring more productive.
Comparison with Alternatives
Before this, I had the “blanket and cardboard” solution I told myself was temporary. It worked about as well as you’re imagining. It trapped dust, annoyed me, and gave me the kind of drafts that feel like ghosts. This enclosure is far more civilized.
There are also hard-shell enclosures that look like appliance cousins. Those are great if you need absolute rigidity, but they’re heavier, pricier, and often fussier when you need to rearrange. For my setup, this fabric-and-frame model hits the sweet spot between function, cost, and ease of use.
DIY IKEA Lack Enclosure vs This Tent
The classic Lack enclosure is a rite of passage. It’s customizable, rigid, and looks crisp if you build it with patience and straight cuts. But it takes time, tools, and a tolerance for small-scale carpentry. I did one. I liked it. I did not enjoy building it as much as I enjoy printing things.
This tent gives me 90% of what I want with 10% of the effort. It’s also easier to move and doesn’t require explaining to guests why the side table has hinges.
Hard-Shell Enclosures
If you need absolute noise reduction and very precise temperature control, a hard-shell might edge this out. But they’re often overkill for hobby setups and less forgiving of quick changes. The soft enclosure is perfect for my “print tonight, rearrange tomorrow” style of living.
I also like that I can store this folded if I need the table for something else. The hard shell becomes furniture; this becomes a neat stack in a closet if I must be a different kind of adult for an evening.
Who This Is For (and Who Might Pass)
I’d recommend this to anyone with a Bambu Lab A1, A1 mini, Ender 3 variant, or similarly sized printer who wants cleaner, quieter, more consistent results without installing a ventilation system that looks like a set from a space movie. If you’re new to ABS/ASA and you’re tired of failures, this is a lifeline. If you print resin and you want everything contained in one tidy habitat, it’s even better.
If your printer is much bigger than the listed 21.65 x 23.62 x 26.38 inches, this is not the tent you’re looking for. Also, if you need total silence or a lab-grade filter, you’ll want dedicated equipment designed for that. For most of us printing in home offices, spare rooms, and dining areas we swear we’ll reclaim someday, this enclosure is just right.
The Good, The Quirky, and The Could-Be-Better
I like a tidy breakdown. Here’s how it shakes out for me after weeks of prints, pauses, and peering through the window like a romantic lead in a sitcom.
| Area | What I Noticed | Verdict |
|---|---|---|
| Size and Fit | Shell is 21.65 x 23.62 x 26.38 inches; fits Bambu Lab A1, A1 mini, and Ender 3 variants comfortably if measured properly. | True to spec; measure your extras (spool holders, cameras) before committing. |
| Assembly | Tool-free frame and fabric; about a few minutes to build and tear down. | Genuinely easy; stable once assembled. |
| Temperature Control | Noticeable improvement for ABS/ASA warping and layer splits; consistent interior climate. | The thermo-hygrometer is simple but valuable. |
| Humidity | Visible readings; helps with resin planning and filament storage awareness. | Light guidance, not lab-grade, but very useful. |
| Noise | 3–6 dB of reduction by my very scientific phone app; softer sound profile. | Not silent, but kinder to roommates, spouses, and pets. |
| Dust Control | Less fine plastic drift; workspace stays cleaner. | Makes cleanup faster and less stressful. |
| LED Lighting | Bright, even, neutral-white; no extra heat. | Excellent for checking first layers and late-night prints. |
| Visibility | Large, clear window with good sightlines. | Watching prints becomes pleasantly compulsive. |
| Build Quality | Sturdy frame, durable fabric, smooth zippers, reinforced seams. | Feels like it will last with normal use. |
| Resin Use | Contains mess and moderates odor spread; still requires ventilation and safe handling. | A meaningful quality-of-life upgrade. |
| Portability | Light enough to move; easy to store if needed. | Great for multi-purpose rooms. |
| Value | Strong feature set at a sensible price point. | High usefulness-to-hassle ratio. |
Tips, Tricks, and Quirks
- Put the thermo-hygrometer where you can read it without unzipping. You’ll look at it more than you think.
- Stage your scraper, gloves, and a small towel inside before starting resin prints. Future you will thank you.
- Route filament so it enters smoothly; external spool holders often behave better in warm enclosures.
- If you print ABS or ASA, keep the enclosure closed as much as possible in the first half of the print. Temptation is strong. Resist it.
- For PLA, you can keep a small gap open if your hotend likes a bit of ambient cooling, but close during drafts.
- Add a small, non-adhesive mat on the enclosure floor. Dropped parts, drips, and streaks stay in one place.
- Check clearance for bed movement at peak Y-extent. It should be fine, but a pre-flight ritual builds confidence.
- Clean the window with a soft cloth. Your sleeve will not do you any favors.
- Coil and secure any extra LED/USB wiring. A tidy interior looks and feels better and prevents accidental snags.
- If you’re running longer prints, a surge-protected power strip with a physical switch near the enclosure is a simple comfort.
Frequently Asked Questions I Asked Myself
-
Will this actually improve print quality, or is it just a fancy cover? For me, it improved results with temperamental filaments and reduced “random” failures that were really just minor environment swings. For PLA, it still helped by keeping drafts away.
-
Does it fit the Ender 3 with a direct drive upgrade? It depends on the height of your mod. Measure from the base to the highest point and compare to the 26.38-inch interior height. Most common conversions still fit.
-
Do I need active filtration for resin? This tent helps contain odors and mess, but it’s not a substitute for proper ventilation or filtration. Use safe practices, and consider an air purifier if you’re printing resin often.
-
How loud is the printer inside compared to outside? Subjectively, it’s quieter and less sharp. Objectively, I saw a modest dB drop that felt more significant than it reads because the sound signature changed.
-
Is the LED light always on? You control it. I prefer it on during early layers and whenever I walk by to gawk. It’s easy to leave off if you’re a stealthy night printer.
-
Does the tent get too hot? Not in my use with PLA, PETG, ABS, and ASA at typical settings. The thermo-hygrometer keeps me informed. If I ever saw unusual numbers, I’d crack the zipper or pause.
-
What about printers smaller than the listed size? Those are ideal. You’ll have room for tools and accessories, and everything feels less cramped.
-
Can I fold it and store it? Yes. It breaks down quickly and stacks neatly, which is helpful if you’re a seasonal printer or you host dinner parties where a glowing tent might raise questions.
Final Verdict
After living with the “3D Printer Enclosure with LED Light, Resin Printer Enclosure with Thermo Hygrometer, 3D Printer Tent Constant Temperature, Dustproof, Noise Reduction for Bambu Lab A1, A1mini, Ender3 Series,” I’m sold on the idea that the environment matters as much as slicer settings and bed leveling. The enclosure gives me a stable, quiet-ish, cleaner workspace that makes every print feel less like a stunt and more like a hobby I actually enjoy.
The wins are clear: easier ABS/ASA printing, less mess, better nighttime visibility, and a sanity-saving reduction in noise. The built-in thermo-hygrometer is a small piece of gear that pays for itself in confidence, and the LED lighting makes me feel like I’ve put my printer on stage—in a good way. Setup is quick, the frame is sturdy, and the fabric is tougher than it looks.
It isn’t an all-in-one lab. You still need ventilation habits for resin, and if your printer is gigantic, the size limit is real. But for Bambu Lab A1, A1 mini, Ender 3 variants, and similarly sized machines, this enclosure hits that sweet middle ground of “does what it promises” and “doesn’t ask you to become an engineer to use it.”
I wanted less dust, less noise, fewer drafts, and a chance to actually see what I’m printing without shining a flashlight through my own fingers. I got all of that, plus a little ritual: I walk by, glance through the window at the warm, lit interior, and feel a small, satisfying calm. My printer keeps doing its raccoon work, industrious as ever, but now it does it in a tidy little world of its own—and I get my desk, my air, and a bit of my sanity back.
Disclosure: As an Amazon Associate, I earn from qualifying purchases.