Have you ever stood over a 3D printer, sniffed the air like a bloodhound on a mystery show, and thought, “Is that success I smell, or just hot plastic plotting a coup inside my lungs?”


Why I Wanted a Ventilation Fan Set in the First Place
I got into 3D printing for the usual reasons: sheer curiosity, mild delusions of grandeur, and a secret desire to make hooks that fit no known standard. My prints got better with time, but the air in my little workspace didn’t. If you’ve ever tried to print ABS in an enclosed space, you know the smell I mean. It’s like a new car met a hair dryer in a small elevator. I wanted something to move the air out, not just gently push it around, and I wanted it to be simple. No wiring diagrams. No awkward trips to the hardware store where I pretend to know what “duct reducer” means.
That’s when I ended up with the 3D Printer Enclosure Ventilation Fan Set with USB5V1A Fan 4000RPM for Effective Extraction Heat and Air Circulation. It sounds like a fan with a LinkedIn profile, but it is, in fact, a perfectly reasonable little solution to a not-so-small problem: stale, warm, chemically scented air. I didn’t need an advanced HVAC lecture; I needed a fan that could go from “out of the box” to “doing something” without me standing there, helpless, holding a roll of duct tape and a prayer.
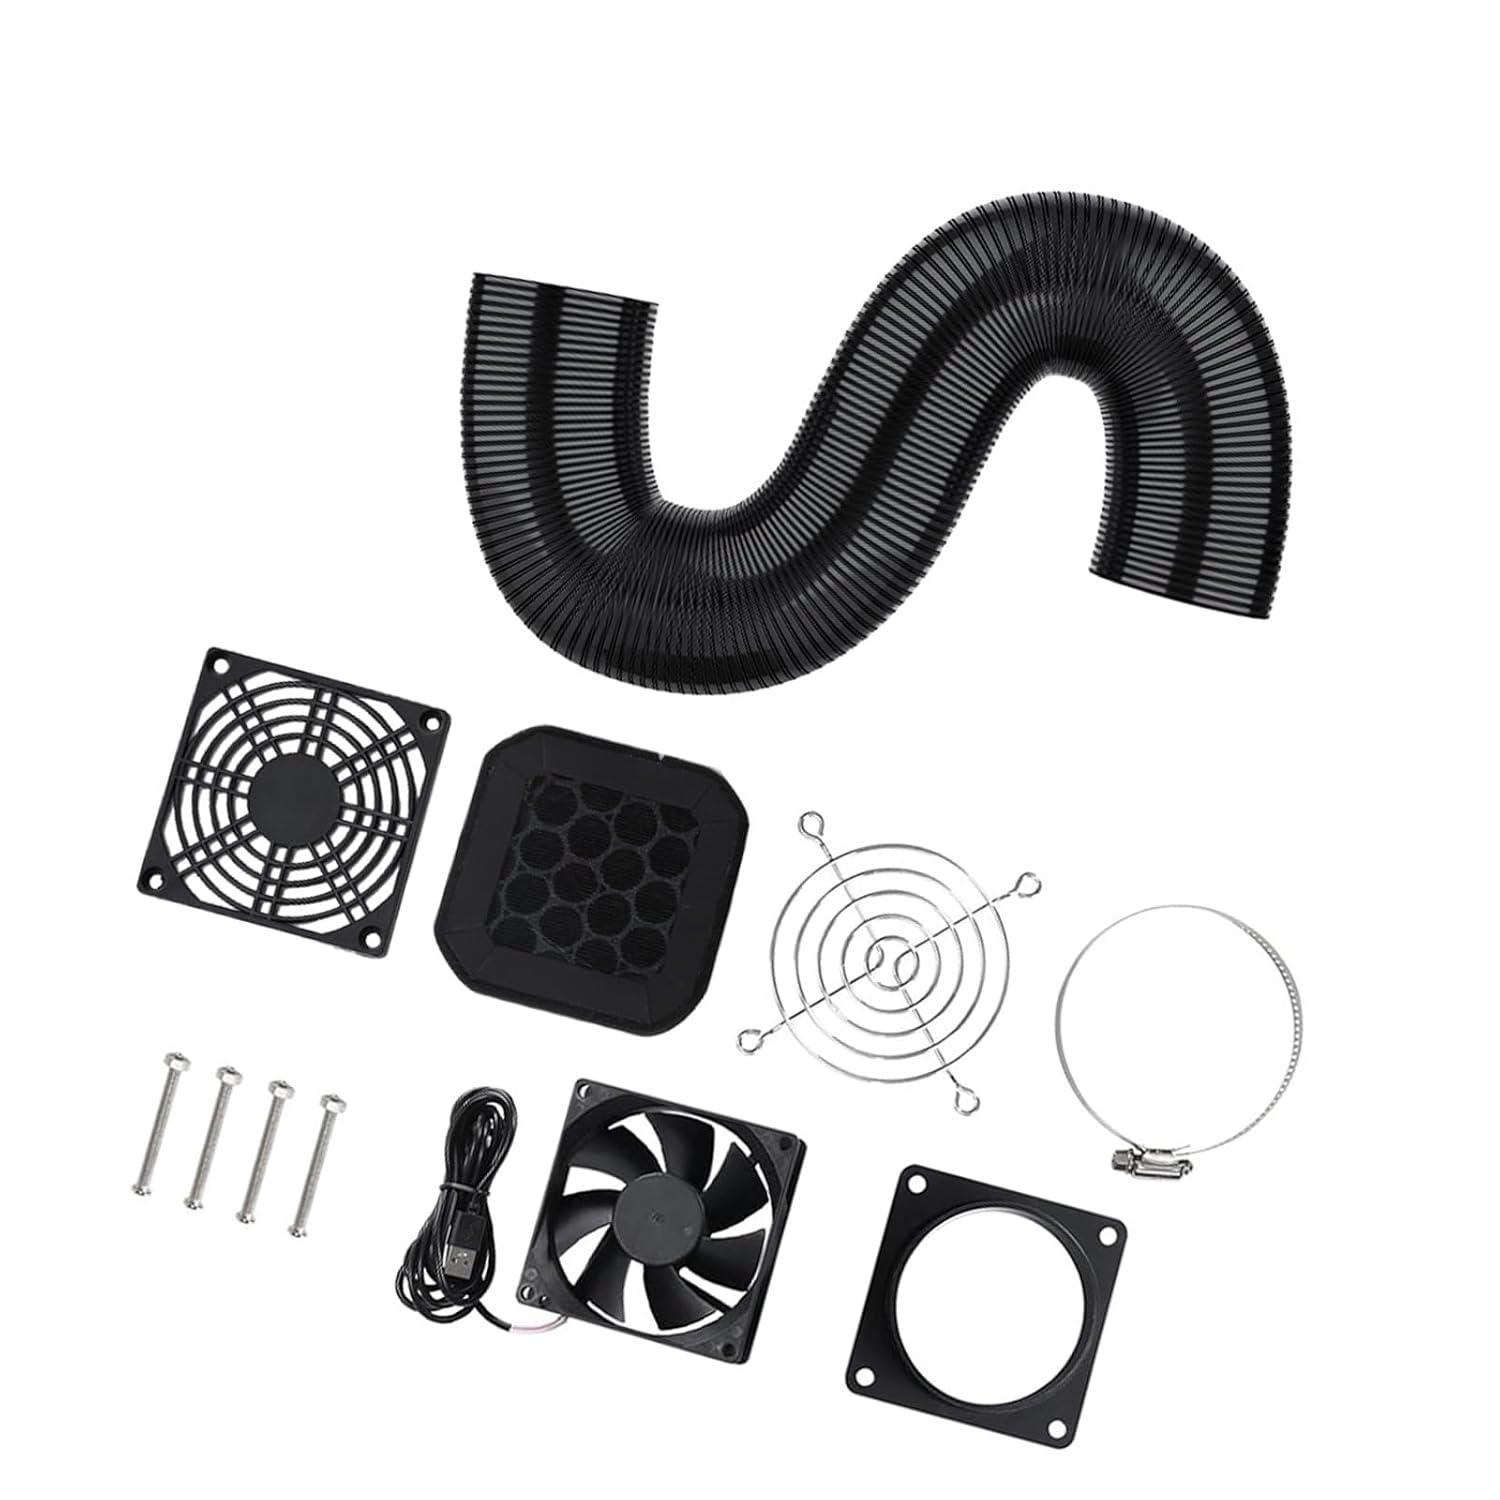
3D Printer Enclosure Ventilation Fan Set with USB5V1A Fan 4000RPM for Effective Extraction Heat and Air Circulation
What This Fan Set Is, in Plain Language
If I had to describe it like I would to my mother: it’s a small, fast USB-powered fan that connects to a modest flexible exhaust duct. It spins at 4000 RPM, sips power at 5V/1A, and comes with a 195cm USB cable and a 200cm exhaust duct. The whole idea is to move warm or smelly air from where you live to a place where you do not. It’s meant for 3D printers but fits into a life that includes kitchens, bathrooms, electronic repair benches, and even pet houses. I don’t claim to have a factory, but I did try it near my electronics work area, which is basically a factory if you count sticky notes as raw material.
It’s not a filtration unit in the lab sense. There’s no HEPA element, no carbon chamber that looks like it belongs in a spaceship. It’s ventilation—air in one place, air out the other. For most home setups, that’s exactly what’s needed.
Key Features at a Glance
I’ve learned that reading product listings can feel like eating dry toast, so I made a quick table to keep the facts from slipping out of my head.
| Feature | Details |
|---|---|
| Power Input | USB 5V / 1A |
| Fan Speed | Up to 4000 RPM |
| USB Cable Length | Approximately 195 cm |
| Exhaust Duct Length | Approximately 200 cm |
| Intended Use | 3D printers, kitchens, bathrooms, electronic maintenance, pet houses, and general ventilation |
| Operation | No built-in switch; turns on when powered via USB |
| Typical Power Sources | USB adapter, power bank, computer USB port |
None of these numbers changed my life on paper, and yet they sort of did in practice. The 5V/1A spec meant I could power it with a tiny wall adapter or a power bank. The 200cm duct gave me just enough reach to chuck the other end out a window without rearranging my entire room. And the “no switch” detail is both a blessing and a quirk—more on that later.
Unboxing and First Impressions
I’ve unboxed enough gadgets to know that packaging can either be flamboyant or sensible. This set leaned sensible. Inside, I found the fan unit, the USB cable, and the flexible exhaust duct. Everything looked straightforward, which wasn’t surprising given the task. It’s not the kind of item that needs a heartfelt welcome speech. The fan’s housing was sturdy enough for my purposes, the cable felt long enough that I didn’t need to stretch, and the duct—blessedly—did not smell like inflated pool toys.
I plugged it in just to hear it and get a sense of the noise. It spins briskly, like a determined bee that’s had a good breakfast. Not silent in a library sense, but purposeful. I could tell it was going to move air rather than gossip about it.
Setup: From Box to Breathing Easier
You’d think hooking up a fan would be simple, and it was. But I’ve also learned that even simple things benefit from an ordered approach, especially if you want the end of the duct to actually reach a window and not just hover behind your printer like an underachieving ghost.
Here’s how I set it up:
- Positioned the fan near my 3D printer enclosure, with the intake side pointing toward the enclosure’s vent cutout.
- Attached the exhaust duct to the fan’s outlet. I used an adjustable clamp I had on hand to snug it up, though some people probably get by just fine with tape.
- Routed the duct toward a window. I cracked the window open and wedged a little foam around it to seal the gap, giving the duct a clean exit to the outdoors.
- Plugged the USB cable into a 5V/1A wall adapter. The fan spun to life instantly.
- Did a quick test: closed the enclosure door, fired up a print, and watched the plastic curl into the future while air quietly evacuated from the room.
I discovered quickly that the fewer bends in the duct, the better. If you’ve ever tried to sip a milkshake through a bendy straw, you already know the physics. There’s a little art to getting a smooth, single compound curve in the duct without creating a kink. I found that once I got the path right, I didn’t have to think about it again.
No Switch: Why That’s Good, and Why It’s A Little Odd
The fan turns on when it’s powered, and off when it isn’t. That means no tiny switch to fail or misplace. For me, it also meant I could use a smart plug and pretend I was running an industrial rig from my couch. If you need manual control, you can pop in a USB in-line on/off switch or a USB shutoff adapter. Personally, I liked the simplicity. It’s hard to overcomplicate “plug and run.”
Performance: What I Actually Noticed
I’ll admit, I usually approach performance claims with the wariness of a cat being shown a new machine. But right away, I noticed the room didn’t get as warm or smell as persistent. With the fan pulling air from the enclosure and sending it outside, I was no longer doing that thing where I open the door and get a faceful of toasted filament. The hot air had a new destination, and that destination was not my nose.
I didn’t use lab instruments. I used the highly scientific method of “how does this feel” combined with “do I now need to open a window wider.” The answer was: less warm, less smelly, and less walking around the room waving a magazine like I was auditioning for a musical about ventilation.
In a 3D Printer Enclosure
This is where the fan set really shines. ABS and certain other filaments give off an odor that some people shrug off and others find intolerable. I fall somewhere in the middle: it isn’t the worst thing I’ve smelled, but it’s not what I want to be breathing for hours.
With the fan drawing air from the enclosure and pushing it out the window, the odor was meaningfully reduced in the room. The printer enclosure stayed a touch more temperature-stable as well, since air was moving steadily in a controlled direction rather than billowing out every time I opened the door like a pastry oven.
I also liked that it helped clear the residual heat after a print. Instead of sitting in a warm little cloud, the room returned to normal faster. If you have a small space and tend to run long prints, this alone is worth it.
In the Kitchen and Bathroom
I brought the fan set into the kitchen during a cooking experiment I should perhaps not discuss publicly. Let’s just say the recipe described “caramelization” and what I achieved was “smell of ambition.” I set the unit on the counter, ran the duct to the window, and let it quietly work. The smoke detector did not replay its greatest hits. The air cleared faster than it would have if I’d relied on my built-in range hood, which seems to exist mostly to make noise.
The bathroom test was more about steam than fragrance. After a long shower, it did a decent job moving moisture out of the room. I wouldn’t replace a proper bathroom vent with it if one is required by code, but for a space where the existing fan is weak or nonexistent, this is a good temporary help. The trick is to place it smartly—closer to the ceiling, duct routed upward then out, so rising steam has a quick exit path.
In a Pet House
I own a pet whose hobbies include sleeping, judging me silently, and generating odor. I put the fan near the pet’s house (not directly blowing on it; I’m not made of ice) and let it move air out through the duct. The space smelled fresher without becoming a wind tunnel. This may also have improved the general morale of the household.
At an Electronics Workbench
I do some hobby soldering, and I’ve always hated how the fumes hang around as if waiting for applause. This fan isn’t a replacement for a true fume extractor with a HEPA filter and effective capture hood, but as a ventilation assist, it’s helpful. If you position the intake near the soldering area and vent outside, you get meaningful relief. For heavy soldering or professional use, consider a dedicated unit. For occasional work, this is a tidy and portable solution.
Noise and Vibration: The Reality Check
At 4000 RPM, you shouldn’t expect silence. What I heard was a steady, concentrated whirr—less than a hair dryer, more than a whisper. It’s not the soundtrack to a meditation app, but I could take a call with it running in the background without feeling like I needed to shout over a helicopter.
Vibration was minimal but detectable when the fan was perched on certain surfaces. I slid a small foam pad under the base, and that quieted the hum to a pleasant background whoosh. If you’re very sensitive to noise, you’ll notice it at full speed in a quiet room. If your printer is already singing its mechanical lullaby, the fan becomes part of the ensemble.

Power Options and Practicality
Here’s where the USB power shines:
- Wall adapter: Plug it in and forget it.
- Computer USB port: Works, though I preferred a dedicated adapter so my PC wasn’t playing life support.
- Power bank: The unsung hero of moveable ventilation. I once ran the fan during a brief power wobble, and it kept on working. If you’re routing air from a bathroom or pet area on a temporary basis, a power bank turns this into a cordless, go-anywhere setup.
At 5V/1A, it’s efficient enough to run for hours without feeling extravagant. I liked that it didn’t heat up the way some bulkier inline fans do.
Safety and Limitations I Actually Care About
- It’s ventilation, not medical-grade filtration. It helps remove fumes and odors by moving air outside; it doesn’t capture ultrafine particles or specific chemicals the way a HEPA/activated carbon system would. If you need filtration, you can add a carbon pad at the outlet, but be careful not to restrict airflow too much.
- Keep the duct path clear. Kinks and squashed sections reduce effectiveness and can stress the fan.
- Keep it dry. This isn’t a bathroom-vent-rated ceiling unit; it’s a portable fan with a duct. Don’t use it where it can get sprayed or soaked.
- No switch means it’s either powered or not. If you want more control, add a USB switch or smart plug. Don’t jury-rig it with exposed electrical nonsense.
- Be mindful of neighbors. Venting out a window is great; venting into a shared hallway is not how to make friends.
Build Quality and Reliability
I’m not one to anthropomorphize small appliances, but if I did, I’d say this fan has a dependable personality. The housing feels sturdy, the wiring isn’t flimsy, and the duct holds its shape well enough for real-world routing. After sustained use, there was a little dust buildup at the intake, which is a good reminder that everything that pulls air eventually asks for cleaning. No rattling, no mysterious screeching—just steady airflow.
I won’t speculate about long-term lifespan beyond saying it behaved like a decent, well-cared-for USB fan should. If you treat it kindly, don’t choke it with a clogged duct, and resist the urge to drop it, you’ll likely be content.
How It Compares to Other Options
I tried to be as fair as possible in comparing this to the alternatives I’ve used or considered.
-
Versus a DIY PC fan and improvised duct: I’ve done this. It can work, but power is usually 12V, so you need an adapter. Mounting is awkward. This set is plug-and-vent, and the duct is sized for purpose. Less tinkering, more air movement.
-
Versus a big inline AC duct fan: Those move more air and often connect to larger ducts. If you’re venting a big printer farm or a room, an inline fan wins on power. But they’re louder, bulkier, need mains power, and aren’t exactly cute. For a single printer or a small space, the USB unit is more manageable.
-
Versus a HEPA/carbon filter fan: Different goal. A filter captures; this ventilates. For resin printing or heavy-duty soldering, you might want a filter. For general room odor and heat, moving the air out is remarkably effective and requires less upkeep.
-
Versus doing nothing: You could keep cracking a window and hoping for a breeze. I did this for months. The result is whatever the weather allows. This fan makes air movement predictable and direct.
Tips That Made a Big Difference
A few things I learned the pleasantly hard way:
- Short, smooth duct runs are your friend. Every bend reduces flow. Think of the duct like a lazy river, not a maze.
- Seal the enclosure. If you’re venting a 3D printer, small gaps are fine, but giant holes reduce the fan’s ability to pull air where it counts.
- Use foam around the window exit. It prevents air from sneaking back in and keeps things tidy.
- Add a simple mesh prefilter to the intake if you’re in a dusty environment. It keeps pet hair out of the fan. Clean it regularly.
- Put the fan on a soft pad. It minimizes vibration noise.
- Consider a smart plug. Being able to turn it on when a print starts (or off when it ends) without walking across the room feels surprisingly luxurious.
Maintenance: The Unexciting Part That Keeps It Working
You don’t need a maintenance log. Just check it every few weeks:
- Wipe the intake grill with a soft cloth or a small brush.
- Inspect the duct for lint or crud; give it a shake outside if needed.
- Make sure the connections are snug and the path is still clear.
- If you’ve added a prefilter, rinse or replace it when it looks like something a vacuum ate.
That’s about it. No filter cartridges to buy, no belts to adjust, no ceremonial chanting required.
Practical Use Cases I Didn’t Expect
- Quick window fan for a room with stale air. I set the intake near the ceiling, pointed it out a window, and it changed the vibe of the room from “I’ve been sitting all day” to “I’ve been ventilated.”
- Post-paint smell mitigation. For small projects with water-based paints, it helps clear the odor faster, provided you vent outside. Not a substitute for masks or proper ventilation for serious painting.
- Temporary air helper in a closet office. It’s not glamorous, but it made a difference.

The Non-Switch Life: A Short Love Letter to Simplicity
I realized something: I like that it just turns on when powered. There’s a certain beauty to a gadget that doesn’t ask me who I am or what I want. That said, I added a tiny USB switch so I could flick it off without yanking the cable. If you’re into automation, a smart plug turns it into a hands-off accessory. Start print, fan runs. End print, fan stops. Even my printer seemed relieved.
A Few Words on Expectations
It’s easy to imagine that any fan with a duct can fix all air-related problems. But like most things that fit in a small box, it has a reasonable scope:
- It moves air decisively for its size.
- It reduces heat buildup around a 3D printer.
- It meaningfully cuts down on lingering odors when vented outside.
- It is not a magic wand for industrial-scale fumes or fine particle capture.
If you know that going in, you’ll probably be delighted. If you’re expecting it to act like a professional lab extractor or an HVAC retrofit, you’ll be annoyed, and then you’ll have to explain to your loved ones why you bought a semi-industrial turbine for a studio apartment.
Real-World Scenarios and How I Used It
ABS Print on a Rainy Day
Rain means I can’t fling the window open and pretend I live in a cross-breeze fantasy. With the fan, I cracked the window just enough for the duct and sealed around it. The room stayed comfortable, my print didn’t smell like a science experiment, and I didn’t have to invite weather into the mix.
Messy Solder Project
I placed the intake as close as practical to the job, like a little dragon sucking up the fumes, and let it run throughout. Not a substitute for a bench extractor, but as a ventilation assist, it was undeniably helpful.
Pet Corner Freshening
I set the fan to pull air from the corner where my pet likes to hold informal meetings. The difference was noticeable without creating a draft that would hurt our friendship.
After-Dinner Smoke Situation
I ran it for fifteen minutes with the duct out the window. The room forgave me eventually.
Value for Money
When I weighed what I paid against what I got, it felt fair—solid even. A ready-to-use fan at 5V/1A, a long USB cable, and a decently long duct. No need to chase odd adapters or invent a way to attach a hose. For anyone who wants to set up ventilation without a weekend project, this is the sort of tool that makes you feel competent with minimal risk.
I also appreciated the portability. It isn’t bolted to a wall, and it’s not a hassle to move. There’s real value in a tool that can travel between tasks without acting like it needs a passport.
Who This Is For
- People with 3D printers who want better air quality and heat control without wiring a fan to their home’s nervous system.
- Renters who can’t cut holes but can crack a window.
- Tinkerers who value plug-and-vent functionality.
- Folks with small kitchens or bathrooms that need a little help after certain aromatic events.
- Pet owners who love their animals and want their homes to smell like love, not like a mysterious museum exhibit.
What I Wish Were Different
Every relationship, even with a fan, invites suggestions:
- A built-in switch would be nice. I understand the elegance of simple power-on, but a switch saves the reach.
- Optional variable speed could help tailor noise and flow for different spaces.
- A small mounting kit or simple brackets would make it easier to secure without a trip to the hardware drawer.
- An add-on carbon pad accessory would be handy for those who want a little odor scrubbing along the way—without translating into a huge flow penalty.
None of these are dealbreakers. They’re more like polite notes passed in class: “You’re doing great; here are three ways to charm me further.”
Troubleshooting: What Went Wrong and How I Fixed It
- Weak airflow? I discovered the duct had a subtle kink behind the printer. I re-routed it with a gentler bend, and the difference was immediate.
- Too loud for late-night printing? Foam pad under the fan and a little duct re-aiming. I also moved the intake a few centimeters from the enclosure wall, which reduced turbulence noise.
- Smell still present? I had a small gap in the enclosure seal near a corner. A strip of foam tape later, the airflow became more controlled, and the odor reduction improved.
Frequently Asked Questions I Asked Myself
Does it filter the air?
It primarily ventilates—moves air out. If you want filtration, you can add a lightweight carbon pad at the outlet, but keep in mind that added resistance reduces airflow. For serious filtration needs, pair ventilation with a dedicated HEPA/carbon unit.
Can I use it with a resin printer?
Yes, as a ventilation aid it’s useful. Vent outside. Resin fumes are no joke. Follow resin manufacturer safety guidance.
Can I run it continuously?
It’s a low-power USB fan designed for regular use. I ran it for long print sessions without issue. Make sure it stays clear of obstructions and has good airflow.
Is it safe to power from a computer USB port?
Yes, but I prefer a dedicated 5V/1A adapter. It’s cleaner and keeps your computer from being responsible for your ventilation scheme.
Can I control the speed?
There’s no built-in control. Some people use USB voltage controllers, but lowering voltage too far can stall the fan. If you need quieter operation, reduce airflow restrictions and add soft mounting rather than starving it of power.
Does it need special maintenance?
Just occasional dusting of the intake and checking the duct for clogs or kinks. That’s it.
Little Things That Made Me Weirdly Happy
- The 195cm USB cable was long enough that I didn’t have to rearrange everything to reach an outlet. Why is this rare?
- The 200cm duct made window venting straightforward without engineering a secondary exit.
- It doesn’t pretend to be smart or connected. It just works, which in the world of small devices can feel like a compliment of the highest order.
Living With It: Day-to-Day Impressions
After a while, the fan faded into the background—always a good sign. It’s the kind of tool I only notice when it’s missing. On days when I forgot to turn it on before printing, I could tell within minutes that the room was not being helped along. On days I ran it in the kitchen, I didn’t have to perform the complicated ritual of flapping a dish towel at a smoke detector like I was negotiating with a stubborn bird.
It also somehow made my workspace feel intentional. There’s something nice about knowing the air has a route and a plan. It’s like when you organize a drawer and suddenly your entire life seems possible.
The Case for Simple Ventilation
We talk a lot about filters and ratings and acronyms, and those matter—but sometimes, the best solution is just getting the air out. This fan set does that without asking me to redesign anything. The USB power keeps it friendly, the duct gives it purpose, and my lungs register quiet appreciation.
Should You Get It?
If you want to improve air quality around a 3D printer, reduce heat buildup, or give a small space a quick way to push air outside, yes. If you’re looking for a professional fume extraction system with deep filtration, this is not that. But for simple, effective ventilation with almost no learning curve, it feels like the right tool—especially in apartments, small studios, and any place where cutting holes in walls is frowned upon.
Final Thoughts
The 3D Printer Enclosure Ventilation Fan Set with USB5V1A Fan 4000RPM for Effective Extraction Heat and Air Circulation is not glamorous, but it is clever in the ways that matter: practical, portable, and willing to work without a saga. It balances power with kindness—you don’t need to rewire your life to use it. It keeps my 3D printer enclosure happier, my kitchen less accusatory, my bathroom less rainforest, and my pet’s corner… let’s call it more diplomatic.
I wanted a simple way to take air from where it shouldn’t linger and send it where it won’t bother me. This little set did exactly that. It’s not trying to be the star of the room; it’s the stagehand that keeps the show running. And in my experience, those are the ones you end up relying on the most.
Disclosure: As an Amazon Associate, I earn from qualifying purchases.