Have you ever wished your first layer would behave itself without you kneeling on the floor like a supplicant before a temperamental machine?
![]()

Why I Chose the Creality Ender 3 V3 SE
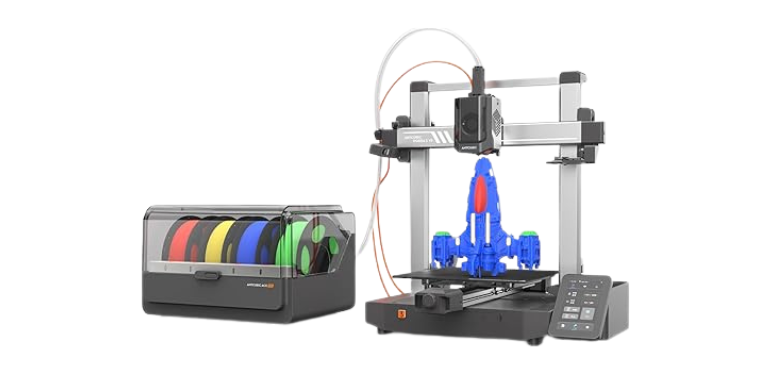
I didn’t want another hobby; I wanted a printer that would behave like an appliance without stealing my Saturday. The Creality Ender 3 V3 SE promised exactly that: a compact 3D printer with a Sprite direct extruder, dual Z-axis stability, CR Touch auto leveling with auto Z offset, and the kind of printing speed that makes me feel like I’ve accidentally set something to fast-forward. The spec sheet reads like a wish list: 250 mm/s max printing speed, 2500 mm/s² acceleration, auto filament loading and unloading, and a color screen. It even claims I could go from assembly to printing in about 20 minutes, which is barely enough time for me to lose the Allen key.
I came to this model after living through the small indignities of earlier Ender 3-era machines: warping corners, leveling wheels that mocked me, and the delicate ballet of adjusting Z offset while an increasingly impatient cat judged my life choices. The V3 SE sounded like the same classic format—220 x 220 x 250 mm build volume—but with the frustrations sanded off and a little personality sprinkled in.

Creality Ender 3 V3 SE 3D Printer, 250mm/s Printing Speed, Sprite Direct Extruder CR Touch Auto Leveling Auto Z Offset Color Screen 220x220x250mm
Unboxing to First Print in 20 Minutes
I am suspicious of anything that says “20 minutes.” It’s usually code for “your sense of time will be distorted and you will lose most of an afternoon.” But the Ender 3 V3 SE made a remarkably honest attempt at that claim. Major components are pre-assembled. I attached the gantry to the base, connected a few clearly labeled cables, and felt unreasonable pride as though I’d built it from ore I smelted in the yard.
The first power-on didn’t greet me with hieroglyphs or an endless menu labyrinth. The color screen walked me through auto leveling and, crucially, auto Z offset. If you’ve ever stood over a printer with a sheet of paper and existential dread, you’ll appreciate how liberating it is to press a button and watch the machine calibrate itself. I loaded filament with a tap of “Extrude,” watched the hotend send out the tiniest ribbon of plastic, and thought, yes, this is how it should be.
The Headline Speed: 250 mm/s, With the Right Caveats
I love speed, but not when it leaves artifacts that look like my print has been through a minor earthquake. The Ender 3 V3 SE’s speed is more practical than brag-worthy, which is a compliment. With default or mildly tuned slicer profiles, I could push many prints into the 150–200 mm/s range with good results. If I bumped it to the headline 250 mm/s, I still got usable outcomes on structural parts and quick prototypes, provided I used sensible layer heights and wall counts.
Acceleration at up to 2500 mm/s² helps the printer get up to speed without feeling like a jackhammer. The dual Z-axis plus 8 mm steel linear shafts give the bed and gantry that firm handshake energy—minimal Z-wobble, fewer micro-vibrations, and a general sense of poise. Do high speeds still require tuning? Of course. But the V3 SE lowers the bar for good results significantly, and that’s a relief.
What Fast Printing Looks Like Day to Day
- Draft parts suddenly fit into a lunch break rather than a workday.
- Brim adhesion holds up even when travel moves are peppy.
- PETG at higher speeds needed slightly reduced cooling and a hair more temperature to maintain layer bonding.
- TPU surprised me by staying consistent at moderate speeds because the Sprite direct extruder kept the filament path short and secure.
Fast isn’t just the number on-screen; it’s how fewer reprints you need. On that front, this machine is genuinely efficient.
The Sprite Direct Extruder: The Star of My Workshop
Direct extruders spoil you. Once you use one, going back to a Bowden setup feels like driving with mittens. The Sprite on the Ender 3 V3 SE manages PLA, PETG, and TPU without drama. Retraction distances are short, stringing is easier to tame, and flexible filaments don’t act like you’ve asked them to navigate a garden hose.
With PLA, I got crisp corners and smooth walls at moderate to high speeds. PETG behaved with its usual temperament—slightly sticky, slightly stringy, nothing the slicer and a little extra temperature couldn’t fix. TPU is the acid test for me, and the V3 SE passed. Small, detailed TPU parts showed consistent extrusion without that accordion-chatter you sometimes see when the filament path isn’t tight.
This extruder design is market-proven, which is a polite way of saying a lot of people have already tried to break it, and it survived. That reliability matters when what you want is a dependable, appliance-like tool.
Auto Leveling and Auto Z Offset: The Fuss-Free Foundation
I used to treat bed leveling like a spiritual practice—light the candle, whisper to the springs, spin the knurl knobs and hope. The CR Touch sensor on the Ender 3 V3 SE turns it into a button press. It probes the bed, maps its little topographical weirdness, and adjusts on the fly. Even better, the printer sets Z offset automatically. I didn’t have to jog the nozzle over a corner and guess with a piece of paper that inevitably tears.
Does that mean you’ll never adjust Z offset again? Not quite. Different filaments and build surfaces can benefit from tiny tweaks. But the “close enough out of the box” baseline is high, and the frequency of fiddling drops dramatically. I started prints with the kind of confidence usually reserved for people who always know where their keys are.
First-Layer Results That Stick (But Not Forever)
- PLA stuck well with a clean build surface and standard temps.
- PETG held on tight enough that I learned to let the bed cool before trying to pry anything off.
- TPU adhered consistently, though I lowered the first-layer speed a bit for best edges.
- The printer’s mesh compensation handled minor bed variances so I didn’t feel like I had to re-level before every print.
Auto Filament Loading and Unloading: A Small Feature with Big Convenience
The “Extrude” and “Retract” buttons are tiny quality-of-life miracles. Instead of fiddling with gears or pushing filament manually, I tapped, the motor did the work, and I saved my wrists for opening pickle jars. Filament swaps no longer felt like a chore. The path is clear, the mechanism grips well, and I didn’t end up with spare noodle-lengths curling out like festive party favors.
I’m the sort of person who will avoid changing a spool if it means facing mechanical faff. This feature nudged me to switch materials more often, which, ironically, led to more prints getting finished because I used the right filament for the job instead of making do.
Stability: Dual Z-Axis and 8 mm Steel Linear Shafts
The Ender 3 V3 SE’s motion system is the quiet type: strong, supportive, and not prone to unnecessary commentary. The dual Z screws calm the vertical movement and keep the X-gantry square, reducing the kind of subtle tilts that manifest as faint ripples on tall prints. Those stout 8 mm steel linear shafts give the bed assembly actual backbone. When I pressed down gently on a corner, it didn’t flex and then gossip about it later.
This rigidity is part of why the printer performs well at speed. It’s not just that the motors can move quickly; it’s that the frame can resist the temptation to wiggle. I noticed fewer artifacts in tall prints, consistent layer lines, and better overhangs when acceleration kicked in and out.
The Compact, Elegant Design That Actually Fits
Everything about the Ender 3 V3 SE’s layout looks considered rather than “good luck, you’ll figure it out.” The tensioners are tucked neatly, the wiring is discreet, and the frame’s T-shaped profiles lead the eye without shouting for attention. It sits on my bench without taking over the room, and that includes the spool placement, which doesn’t require acrobatics to swap materials.
The footprint is compact, but the build volume of 220 x 220 x 250 mm is the sweet spot for most practical prints. I rarely find myself butting up against it. When I do, it’s usually because I’ve grown overambitious, not because the printer is small.
Usability and UI: Color Screen Without Confusion
The color screen shows what matters with clear icons and straightforward menus. It doesn’t try to entertain me or insist I download an app before heating the nozzle. I could start, pause, and adjust a print without feeling like I needed a shift key and a PhD. Temperature changes, manual moves, and filament actions are all where I expect them to be.
I appreciate that the screen is informative without turning into a Vegas marquee. When something goes wrong, it’s not shy about saying so, and I can actually get to the controls I need without six layers of confirmation.
![]()
My Print Quality Results Across Materials
I keep a mental scorecard of what each printer in my space is good at. The Ender 3 V3 SE’s card reads like this:
- PLA: Crisp edges, clean top surfaces, and steady layers even on tall parts. Supports break away cleanly with sane settings. High-speed prints keep their dignity.
- PETG: Slightly glossier appearance with firm adhesion. Reducing cooling a notch helps with layer bonding. Bridges are good if you give them proper fan time.
- TPU: Predictable extrusion, minimal kinking on the spool unwind, clean outlines at moderate speeds. It shines on functional gaskets, phone stands, and little bumpers that I pretend are for furniture but are really for my sanity.
Small wonders include corners that don’t overshoot wildly, infill that doesn’t rattle, and neat perimeters that line up like they’ve rehearsed.
Real-World Speed: Where 250 mm/s Makes Sense
The physics of 3D printing mean that you will, at some point, trade time for polish. That said, the V3 SE sent many of my standard prints through the machine in roughly two-thirds the time I expected. Prototype brackets, utility hooks, storage bins, and the occasional silly trinket came out fast enough that I didn’t feel like I was babysitting a kettle.
If your workload favors functional parts over miniature figurines with ornamented cloaks, this printer’s speed advantage is tangible. You can still print miniatures—just ease the speed back and let detail have its moment.
A Short, Honest Comparison with the Ender 3 Family
I’ve used multiple generations of Ender 3 variants. The V3 SE represents a qualitative step up in everyday convenience and out-of-the-box results. The dual Z-axis, the Sprite direct extruder, the auto leveling with auto Z offset, and the higher speed capabilities make it feel like a graduating class.
Earlier models could absolutely produce excellent prints, but they often asked you to tinker more, mod more, and accept a slower pace. Here’s how I frame it: the V3 SE is what I wish the earlier Ender 3 models had been when I was just starting out—less gatekeeping, more printing.
Where It Stands Out
- Direct extruder versus the Bowden setups common to earlier Ender 3 units means better control over flexible filaments and retractions.
- Dual Z-axis and 8 mm shafts counteract wobble, making taller prints more consistent.
- Higher speed ceiling without immediate print quality chaos.
- Built-in auto leveling with CR Touch and auto Z offset eliminate the most common new-user frustration.
- A cleaner, more compact design that looks like it was assembled on purpose, not just because there were screws left over.
The Details That Made Me Smile
- Auto filament loading/unloading: I didn’t know how much I wanted this until I had it.
- Fast start-up: From box to print in about the time it takes me to choose a movie I won’t finish.
- Quiet competence: It hums along without theatrics.
- A color screen that keeps me informed without drama.
A Few Quirks and Considerations
No machine is an angel, and I wouldn’t trust one that pretended to be. Here’s what I noticed:
- Speed is a privilege you earn with tuning. Jumping straight to 250 mm/s on intricate parts isn’t a fairy tale; you’ll still want to optimize slicer settings.
- The first layer is better than average right away, but material changes can still ask for slight Z offset adjustments. This is normal; don’t panic.
- While the design is compact, you still need clear space for the bed to move and room to access the filament path. Plan your bench layout accordingly.
- The UI is straightforward, but like any machine, it pays to poke around and learn the menus before you’re frantically searching mid-print.
None of these are dealbreakers; they’re just the normal handshake you do with a new tool.
Setup and Slicer Tips That Worked for Me
I’m not a wizard, but I can follow a few rules that keep gremlins away. These helped:
- Start with manufacturer profiles in Cura, PrusaSlicer, or Creality Print if available. Tweak one thing at a time.
- For fast prints, try 0.2 mm layers, 2–3 walls, 15–20% infill, and keep perimeters a bit slower than infill for clean edges.
- Use slightly higher temps for PETG at high speeds to maintain layer adhesion.
- For TPU, reduce retraction distance and speed; let the direct extruder do the work.
- Keep first layer slow and steady. I set the first layer speed lower than the rest to guarantee adhesion.
If the first layer goes smoothly, the rest of the print is usually a social occasion.
Maintenance: The Not-Very-Exciting Secret to Reliability
A printer that runs well is often a printer you fuss over just enough. My routine:
- Wipe the nozzle before a big print, and brush away any caramelized bits from earlier adventures.
- Keep the build surface clean. Hand oils and dust are the enemy of adhesion.
- Check belt tension monthly; the discrete tensioners make this painless.
- Make sure the Z screws are clean and lightly lubricated. Grit is not a performance enhancer.
- Run a probe/leveling routine after moving the printer or changing nozzles.
This sounds like a lot, but it fits into the corners of my week without complaint.
Safety Notes Without the Hand-Wringing
It’s still a hot piece of equipment that can make plastic fumes and heat up to uncomfortable levels. I give it room to breathe, keep it on a stable surface, and don’t leave it running unattended when I’m out of the house. Filament fumes are faint, but I still prefer some airflow. The wiring and connectors are tidy, and I didn’t spot any gremlins in the cable management—no brittle corners, no wires dangling like spaghetti over a camp stove.
The Way It Fits Into My Workflow
I didn’t buy this to decorate the bench. I wanted a daily driver. The V3 SE became the printer I most often turn to when I need a reliable part fast: a bracket, a tool caddy, a phone stand, a replacement clip, a test fit for a larger assembly. It’s quick to set up, resilient across materials, and predictable once you’ve dialed in a profile you like.
This is the difference between “I’ll print that someday” and “I’ll print that this afternoon.”
![]()
What the Specs Look Like in Plain English
Below is how I think about the main features, translated from spec-sheet to human:
| Feature | What It Is | Why I Care |
|---|---|---|
| Max print speed: 250 mm/s | How fast it can push plastic | Faster prototypes and utility prints without turning them into confetti |
| Max acceleration: 2500 mm/s² | How quickly it reaches speed | Crisp corners and solid infill without wobble |
| Sprite direct extruder | Motor on the printhead, short path | Cleaner retractions, better TPU handling, fewer stringy tantrums |
| CR Touch auto leveling | Probe maps bed, adjusts live | No spring-twisting ritual before every print |
| Auto Z offset | Sets the nozzle height intelligently | First layers that actually stick without guesswork |
| Auto filament load/unload | Buttons for “Extrude” and “Retract” | Spool changes without wrestling |
| Dual Z-axis | Two lead screws for X-gantry | Reduced Z-banding, stable tall prints |
| 8 mm steel linear shafts | Stiff guidance for the bed | Long-term stability and fewer wobbles |
| Color screen | Visual, icon-based control | Intuitive adjustments and status at a glance |
| Build volume: 220 x 220 x 250 mm | The space you can print in | Big enough for most projects, compact enough for most desks |
| Fast start-up (~20 minutes) | Quick assembly and calibration | Printing the same day you open the box |
Comparing the Ender 3 V3 SE to Older Ender 3 Models
I promised myself I’d keep this fair. The older Ender 3 models have their place, and with tinkering, they can shine. But if you want a clear picture of how the V3 SE improves the core experience, here’s a practical comparison I use:
| Aspect | Ender 3 V3 SE | Typical Older Ender 3 Variants |
|---|---|---|
| Extruder | Sprite direct drive | Often Bowden-style |
| Bed leveling | CR Touch auto leveling + auto Z offset | Manual or add-on sensors |
| Z-axis | Dual Z | Often single Z |
| Speed | Up to 250 mm/s | Usually lower practical speeds |
| Stability | 8 mm steel linear shafts for support | Lighter guidance, more flex |
| Setup time | Quick, guided | More manual tweaks post-assembly |
| Screen | Color, straightforward UI | Varies; often simpler displays |
| Material range | PLA, PETG, TPU out of the box | TPU often trickier with Bowden setups |
| Design | Compact, tidy cable management | Functional, sometimes less refined |
The takeaway is simple: the V3 SE focuses on removing friction. If you love modding, older models gave you a canvas. If you love printing, the V3 SE gives you momentum.
Project Examples That Show Off Its Strengths
- Home organization: Drawer dividers, cable clips, bespoke brackets that hold exactly the thing you keep misplacing. Fast, clean, durable in PLA or PETG.
- Workshop tools: Caliper stands, drill-bit indexes, wall mounts for odd-shaped gear. PETG nails this kind of utility.
- Household repairs: Replacement knobs, hinge shims, small fixtures that fail at the worst possible time. Even TPU gaskets when you need a bit of flex.
- Education and modeling: Geometry pieces, mechanical models, small architectural studies. Speed makes iteration less of a chore.
- Cosplay and props: Large parts split across the 220 x 220 bed, then glued and sanded. Zero drama first layers are everything here.
The point is not that it can do everything, but that it makes the ordinary jobs pleasantly, reliably quick.
Noise, Vibration, and Living with It
The Ender 3 V3 SE is calm by 3D printer standards. You’ll hear fans and steppers doing their work, but in my home office it doesn’t compete with an average conversation. At high speeds, the motion still feels controlled; no wild thrashing or odd resonance. The sturdy frame earns its keep.
If you’re especially sensitive to noise, a rubber mat under the printer helps isolate vibrations from the table. I did this less because it was necessary and more because I like the illusion of professionalism.
Reliability and Trust: The Invisible Feature
Creality notes that the Sprite extruder design is backed by widespread adoption. In my experience, that matters. It means parts are readily available, community knowledge is deep, and you won’t feel like you bought a boutique machine that requires a blood oath for spare components.
Across weeks of use, I had no missed steps, no mysterious layer shifts, and no spontaneous games of “what is that rattling sound?” When I did something dumb—and I inevitably did—the machine was honest about it. It didn’t gaslight me with inscrutable errors.
When Things Go Wrong (And How I Fixed Them)
I’ve never owned a printer that didn’t occasionally plot against me. On the V3 SE, the “plotting” felt more like misunderstandings:
- Minor stringing at high speed: I lowered nozzle temp a hair and nudged retraction speed. The Sprite responded quickly.
- Over-adhesion with PETG: I let the surface cool before removal and gave the first layer a bit more Z height. Sanity restored.
- Slight elephant’s foot on quick drafts: I trimmed initial layer squish in the slicer and tightened the first-layer speed. The base squared up.
None of these required tools beyond the slicer and a gentle recalibration of my expectations.
Accessory Thoughts Without Turning It into a Lego Set
I’m usually wary of going down the mod rabbit hole. The Ender 3 V3 SE doesn’t need much. If you must accessorize:
- A set of spare nozzles so you can swap rather than soak.
- A filament guide or clip if your spools are especially unruly.
- A decent set of flush cutters and a plastic scraper for post-processing.
That’s about it. The point is to print, not to make the printer your personality.
The Feel of the Finished Parts
It’s easy to treat 3D printing like a puzzle solved only by numbers, but there’s a tactile quality to the results. Parts from this machine feel consistent. The walls line up without that tiny staircase mismatch. Top layers iron over neatly at standard settings. Threads printed with the right clearances function out of the gate. PETG parts click into place with a satisfying resistance. TPU cushions bounce back instead of sulking.
When I run my fingers over the layer lines, they feel tidy, not ragged. It’s an aesthetic thing, but also a confidence thing.
What I Wish I’d Known Sooner
- Auto Z offset doesn’t mean I’ll never tweak; it means I’ll tweak rarely and with purpose.
- Pushing speed is fun, but keeping perimeters a tad slower than infill preserves surface quality without sacrificing overall time much.
- The Sprite extruder is forgiving, but it rewards proper retraction and pressure advance tuning if your slicer supports it.
- A clean, level surface is still the first commandment. Fortunately, the machine makes it easy.
Everyday Joys: The Small Stuff That Adds Up
I appreciate the little chorus of competence this printer sings. The screen comes on and doesn’t blare. The probe taps the bed and gets on with it. Filament loads with a whir instead of a wail. I look over mid-print and see neat, parallel lines building something useful. That’s the kind of quiet satisfaction I’m after.
Who the Ender 3 V3 SE Is For
- Beginners who want results without feeling like they’re taking on a second degree.
- Returning hobbyists who remember the fiddling and would like less of it.
- Practical makers who need functional prints fast and often.
- Tinkerers who still want room to tune but don’t want to start from zero.
It fits the broad middle beautifully—the people who value output over mythology.
Who Might Want Something Else
- If you want an enormous build volume, you’ll outgrow 220 x 220 x 250 mm.
- If your heart is set on exotic filaments that demand high-temperature, fully enclosed environments, this isn’t the best match without extensive modifications.
- If you absolutely need network printing or specific automation features, you might prefer a machine with built-in connectivity tailored to that workflow.
None of these are criticisms; they’re just different jobs calling for different tools.
My Verdict After Living With It
The Creality Ender 3 V3 SE earns its place by making fast, competent printing feel natural. Its Sprite direct extruder gives you control without drama. The CR Touch and auto Z offset dissolve the most common beginner pain points. Dual Z-axis and robust 8 mm steel linear shafts give the frame the posture it needs to go quick without going sloppy. The color screen tells you what you need to know without treating you like a confused guest at a mystery party.
Most importantly, I press print more often because I trust it to work. That’s what I want from a tool: less theater, more results. The V3 SE gets that right.
Final Thoughts I Actually Mean
Every once in a while, a printer lands not by flashing novelty but by quietly fixing the things that used to trip me up. This is that printer. It starts printing in about 20 minutes instead of making me sign a peace accord. It handles PLA, PETG, and TPU without theatrics. It reaches for 250 mm/s with surprising poise. It levels itself, sets its Z offset, and lets me swap filament with buttons instead of prayer.
In a world of complicated choices, I appreciate a machine that is candid about what it can do and then does it. The Creality Ender 3 V3 SE is that kind of honest companion in the workshop—compact, elegant, capable, and quick to get along with.
If your checklist includes speed, stability, friendly setup, and the comfort of knowing you won’t spend your weekend on your knees with a hex key, then this model checks the boxes and kindly slides the pen back to you.
Disclosure: As an Amazon Associate, I earn from qualifying purchases.