Have you ever had a machine politely teach you patience, and then—almost sheepishly—apologize by being fast?
![]()

Why I Picked the Creality Ender 3 V3 SE for My Workbench
I wanted a printer that didn’t treat me like a contestant on a game show called “Guess That Z Offset.” I also wanted speed without the drama. The Creality Ender 3 V3 SE promised 250mm/s printing, CR Touch auto leveling, a Sprite direct extruder, and the kind of stable frame that looks like it could hold my family’s expectations.
The Shopping List in My Head vs. Reality on the Desk
My mental checklist was short and stubborn: fast, reliable, quiet-ish, and easy to set up. After several weeks with the Ender 3 V3 SE, I found myself crossing off items like a conscientious grocery shopper. Not only did it set up in about 20 minutes, it behaved like a printer that wants me to succeed—even when I clearly don’t deserve it.

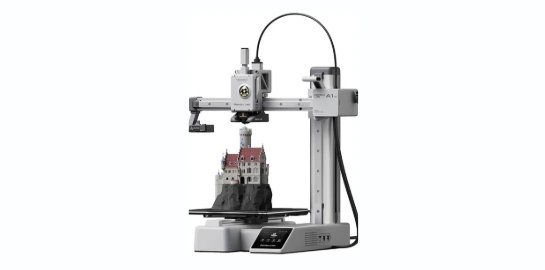
Creality Ender 3 V3 SE 3D Printer, 250mm/s Faster FDM 3D Printers with CR Touch Auto Leveling, Sprite Direct Extruder Auto-Load Filament Dual Z-axis & Y-axis, Printing Size 8.66 * 8.66 * 9.84 inch
The Speed Story: 250mm/s and Real-World Results
Creality claims up to 250mm/s with 2500mm/s² acceleration, and that’s the headline that made me arch an eyebrow. In practice, I nudged it up to those numbers for certain geometries, and it surprisingly kept the quality respectable, especially with PLA. In sensible daily use, I hovered between 120–180mm/s for outer walls and let it sprint for infill and travel moves.
Benchmarks I Actually Care About
I timed a classic 3DBenchy because that’s the law of our land. With a 0.2mm layer height and a tuned profile, I got a Benchy done in the 35–45 minute window, clean enough that I didn’t feel the urge to apologize to it. Calibration cubes looked sharp at 150mm/s with acceleration at around 1500–2000mm/s². You can push further, but ringing will remind you that physics isn’t here to be your friend.
The Setup: From Box to First Layer in About 20 Minutes
I’m suspicious by nature, so “start printing within 20 minutes” sounded like a prank. But after attaching the gantry, plugging in a few labeled connectors, and running the leveling routine, I was queued up to print before my tea got cold. I did heed the warning to check the power supply switch was set to 115V for my outlet before turning it on. It’s the kind of small step that can turn a happy afternoon into a smoky retelling.
Leveling That Doesn’t Ask for Faith, Just Button Presses
The CR Touch auto leveling handled 16-point probing like a chaperone at a school dance—calm, thorough, and slightly judgmental of my past attempts at manual leveling. Then the strain sensor took care of the Z offset, which is usually when I start muttering. The UI shows motion graphics for the leveling and makes it feel pleasantly transparent, like I’m watching the printer do tai chi for its core stability.
Sprite Direct Extruder: PLA, PETG, and TPU Without Fuss
The Sprite direct extruder is the good kind of familiar—Creality has shipped over 500,000 of these, and it shows. It grips filament with the confidence of a toddler with crayons, feeding consistently and retracting without turning my PLA into decorative spaghetti.
Flexible Filament, Minimal Drama
I tried TPU at 35–45mm/s and got a phone stand that didn’t curl like a potato chip. The direct drive setup makes flexible materials far less intimidating, and the extruder’s path keeps the filament supported. For PETG, I ran 235°C on the nozzle and 75°C on the bed with a small negative Z offset tweak to avoid welding the part to the plate. PLA was happiest around 205–215°C, depending on brand and mood.
Structural Stability: Dual Z, Dual Y Shafts, and the Confidence of a Sturdy Frame
Dual Z-axis lead screws tied with a timing belt reduce wobble, and the Y-axis rides on two 8mm linear shafts that feel like they’ve hit the gym and eat their greens. The result is consistent layer alignment and fewer ripples, even when I push speeds past my better judgment.
Why This Matters in Real Prints
When printing tall vases or functional brackets, the vertical consistency matters. I printed a 9.5-inch-tall spiral vase at 0.28mm layers and it felt like a victory lap. Corners stayed crisp, and artifacts were present but polite. Fast infill didn’t rattle the machine into forgetting its manners.
Noise: Quiet Steppers, Realistic Fans
The 32-bit silent mainboard and quality stepper drivers do what they should: keep the motors whispery. The fans are the noisier characters, which is normal for printers in this class. My unit was comfortably workroom-friendly; I could have a conversation next to it without raising my voice, though I wouldn’t choose it as a bedroom companion unless I already sleep with a white noise machine.
The Sound of “It’s Working”
The biggest sound note here is that at 250mm/s, you hear the mechanics doing their job, not screaming for help. It’s a controlled swish and chatter, like someone leafing through a very determined magazine.
Build Surface: PC Spring Steel That Makes Part Removal Oddly Fun
The spring steel sheet with a PC coating has the right amount of stick at typical PLA and PETG temperatures. When the bed cools, parts often lift with a satisfying “I guess we’re done here.” For stubborn prints, a gentle bend of the plate is all it takes. A swipe of isopropyl alcohol keeps it honest.
First Layer Success Without Manual Hair-Pulling
The combo of auto Z offset, CR Touch leveling, and a forgiving surface meant my first layer success rate went from “roll the dice” to “did I suddenly become competent?” Even if I didn’t, the printer hid it well.
Filament Loading: Tap, Tap, Done
Automatic loading and unloading is one of those small luxuries that spoils you. Tap “Extrude,” and filament flows out of the nozzle as advertised. Tap “Retract,” and it scoots out like it knows it’s time to leave the party. It makes color changes feel less like an intermission and more like a wardrobe change.
Small Feature, Big Quality-of-Life Improvement
I used to dread cleaning out strings of stray filament. Now the process is clean and consistent. I clip the filament at a sharp angle, tap the screen, and pretend I’m doing something far more technical than pushing a button.
![]()
Build Volume: 8.66 x 8.66 x 9.84 inches (220 x 220 x 250mm)
This size hits a sweet spot. It fits in my workspace without pretending to be a coffee table, and it’s big enough for helmets in pieces, cosplay props, kitchen organizers, and embarrassingly large calibration cubes. I printed a nested drawer organizer set that made me feel clever every time I opened the utensil drawer.
Larger Prints Without the Looming Anxiety
You can fill the bed with four or five mid-size parts and run a productive batch without hovering. Combined with the speed, I found myself absorbing small mistakes as learning, not setbacks.
A Quick-Glance Breakdown
Sometimes I want the lay of the land in one place so I can nod thoughtfully and pretend I’m decisive. Here’s the table I wish I had before I set it up.
| Feature | What I Got | Why It Mattered |
|---|---|---|
| Top speed | Up to 250mm/s, 2500mm/s² acceleration | Fast iteration and less waiting, with good quality at reasonable speeds |
| Setup time | About 20 minutes | Actually printing the same afternoon |
| Leveling | CR Touch auto leveling + strain sensor Z offset | Reliable first layers without fiddling |
| Extruder | “Sprite” direct drive | Smooth PLA/PETG, easy TPU, consistent retraction |
| Motion system | Dual Z with timing belt, dual 8mm Y shafts | Reduced wobble and better vertical consistency |
| Mainboard | 32-bit silent | Quiet motors, responsive UI |
| Build plate | PC spring steel | Strong adhesion while hot, easy release when cool |
| Filament handling | Auto load/unload | Faster swaps, fewer jams |
| Build volume | 220 x 220 x 250mm | Fits most of my projects comfortably |
| Noise | Quiet steppers, average fans | Workroom-friendly |
| Power note | Check 115V switch before powering on | Avoids a dramatic afternoon |
| Materials | PLA, PETG, TPU | Common everyday materials print well |
Getting to the First Print: My Actual Sequence
I like steps. Steps keep me from trying to level the gantry with a butter knife. Here’s how I got from box to Benchy without calling a friend who knows what they’re doing.
My Setup Steps
- Unboxed and laid out parts like I was curating a small museum.
- Attached the gantry to the base with the included bolts, which were better labeled than my filing system.
- Plugged in the connectors—everything was keyed and clear.
- Checked the power supply voltage switch and set it to 115V for my region.
- Powered on, selected language and ran the auto-level routine (CR Touch did its thing; I watched the UI’s helpful graphics like a proud parent at a recital).
- The strain sensor set the Z offset—no shims, no business cards, no dubious sacrificial offerings.
- Loaded filament with the auto-load button and waited for that satisfying first ooze.
- Picked a test print from the card and let it run while I made tea and congratulated myself prematurely.
Slicer and Profile Choices
- Software: I used Creality Print and Cura. Both did well, but I stuck with Cura out of habit.
- Speeds:
- Outer walls: 120–150mm/s for my quality prints; up to 180mm/s for fast prototypes.
- Infill: 200–250mm/s if I felt daring; 180mm/s more commonly.
- Travel: 200–250mm/s to minimize stringing without knocking the print loose.
- Acceleration: 1500–2000mm/s² for a quality/speed balance; up to 2500mm/s² for show-off mode.
- Temperatures:
- PLA: 205–215°C nozzle, 60°C bed.
- PETG: 230–240°C nozzle, 70–80°C bed.
- TPU: 215–225°C nozzle, 50–60°C bed.
- Retraction: 0.6–0.8mm at 30–45mm/s for PLA with the direct extruder.
- Cooling: 100% for PLA after the first few layers; 50–70% for PETG; minimal for TPU.
Print Quality: Where It Shines and Where It’s Just Good
Out of the box, I got sharp corners and smooth layers with PLA, especially at 0.2mm. With PETG, I needed to baby the first layer more carefully, but after dialing it in, stringing was manageable and surfaces were glossy without being goopy. TPU was shockingly well-behaved—bridging obviously isn’t its strong suit, but dimensional accuracy was fine for functional prints.
High-Speed Caveats I Learned the Honest Way
Ringing can appear at very high speeds, especially with sharp corners. This isn’t unique to this printer; it’s physics wearing a suit and asking if you’ve met inertia. Keeping outer walls slower and using higher speeds for infill keeps the outside looking tidy. I also learned to not crank jerk and acceleration like I’m racing for a prize.
Reliability and Consistency Over Weeks of Prints
I threw a lot at this machine: multi-hour prints, multiple materials, changing humidity, and the occasional “oops” when I forgot to clean the bed. It handled the chaos like a patient mentor, not a scolding teacher. The Sprite extruder never ground filament or chewed it into confetti. The frame stayed square, and the motion system stayed aligned.
Maintenance I Actually Did
- Brushed off the build plate with isopropyl alcohol every few prints.
- Checked belt tension every couple of weeks.
- Vacuumed gently around the base to avoid dust building up.
- Verified the bed screws were still snug but didn’t over-tighten anything—no need to turn this into a gym day.
Practical Notes on Materials and Environment
This is not an enclosed printer, and I treated it accordingly. PLA and PETG were the bread and butter; TPU was dessert. If you’re aiming for ABS or ASA, you’ll want an enclosure to keep warping at bay and to handle fumes properly. I kept mine in a well-ventilated room and didn’t push materials past their comfort zone.
Nozzle and Heatbreak Thoughts
My unit’s hotend handled PLA, PETG, and TPU with ease at the temperatures listed earlier. If you plan to print higher-temperature materials, consider upgrading to an all-metal hotend. For most home and hobby use, the stock setup is exactly what it should be: consistent and predictable.
File Handling and Connectivity
On my unit, I used a memory card to load prints—pretty standard for printers in this range. I didn’t have built-in Wi-Fi, and I didn’t miss it. When I needed to babysit a print remotely, I relied on a humble camera and my own capacity for mild obsession.
Firmware and UI Notes
The UI on the color screen is intuitive. Visual feedback during leveling is helpful, and the menus make sense even when I’m under-caffeinated. I checked for firmware updates on Creality’s site and kept things current; it’s a good habit that prevents mysteries later.
Things I Printed That Made Me Weirdly Happy
- A kitchen drawer organizer that made me feel like a person who has systems.
- A TPU phone stand that refused to skid off my desk even when my cat insisted it should.
- Calibration cubes at different speeds that quietly told me where my limits were.
- A miniature planter that looked far more expensive once I rubbed it on a towel and called it “finished.”
What Didn’t Make Me Happy (At First)
I tried a PLA wall at 250mm/s outer walls like a rebel. It printed, but the surface looked like a topographical map of bad decisions. I recalibrated my ambition, slowed the outer walls to 120mm/s, and accepted that the laws of motion have lawyers.
![]()
Who This Printer Is For (According to Me)
- Beginners who want a painless first layer, faster prints, and a path to success without tinkering first.
- Intermediate users who want a reliable daily driver that can do fast prototypes and decent-quality parts.
- Anyone who’s been burned by leveling rituals and just wants to press buttons and print.
Who Might Want Something Else
- People who need an enclosed chamber or industrial materials.
- Folks allergic to minor adjustments or who want everything pre-tuned to perfection at 250mm/s for cosplay-quality figures out of the box. You can get close, but you’ll want to tune.
Comparisons I Actually Considered
I’m not shy about stacking a machine against its neighbors if it helps make sense of the choice.
Versus the Ender 3 V2/Neo/Pro
Those older models are proven and mod-friendly, but they’re Bowden setups and slower. The V3 SE brings direct drive, better auto leveling, and a stronger motion system. I’d pick the V3 SE any day for the speed and first-layer success alone.
Versus the Ender 3 S1/S1 Pro
The S1 Pro adds higher temp capabilities with an all-metal hotend and some extras. The V3 SE wins on value and speed for most common materials. If you’re planning to print nylon or polycarbonate, the S1 Pro (with enclosure) makes more sense. If you’re mostly PLA/PETG/TPU, the V3 SE hits the sweet spot.
Versus a Prusa Mini+
The Mini+ is consistent and refined, but not geared for this level of speed out of the box. The Ender 3 V3 SE is faster and more budget-friendly, with auto features that level the playing field. If you crave a tighter ecosystem and support, the Mini+ is lovely. If you want speed + value, the V3 SE is compelling.
The Little Things That Add Up
- The motion-graphic UI for leveling: kind and clear.
- Auto filament loading: makes me feel like I live in the future.
- Y-axis linear shafts: lend a sense of durability you can feel when you move the bed by hand.
- The PC-coated sheet: forgiving adhesion without turning every first layer into a crime scene.
- The “start printing within 20 minutes” claim: unusually true in a hobby where time estimates are usually fiction.
The One Important Warning I’m Repeating
Before your first power-on, check the power supply switch. If you’re in a 115V region, make sure it’s set correctly. I know I’ve said this already. I’ll say it again, because the smell of mis-set power is not a memory you want.
Tips That Saved Me Time (and Filament)
- Cut filament at a sharp angle before auto-loading; it seats faster.
- For PLA sheen: slow outer walls to 120–140mm/s; you’ll see cleaner surfaces.
- For PETG stringing: reduce cooling to 60%, use a 0.8mm retraction, and keep the nozzle clean.
- Clean the plate often. PLA residue will sabotage adhesion faster than you can announce you’ve “finally nailed first layers.”
- Batch print small parts with a skirt, not a brim, if you’re confident. It saves cleanup time and leaves your ego neatly intact.
Honest Limits I Bumped Against
- Open-frame printing limits your high-temp material options without an enclosure.
- At full speed, very detailed miniatures lose their charm. I scale back for fine art prints.
- Fans are not library-quiet. If silence is sacred, you’ll be negotiating.
Where It Over-Delivered
- Time savings felt real. Creality says it “saves 73% of the time” compared to some printers; I didn’t measure that exactly, but I did notice my evenings felt longer.
- TPU was easier than expected. I thought it would be a wrestling match; it was a firm handshake.
- First layer success felt like a personality change—for me, not the printer.
Troubleshooting Moments and How I Fixed Them
Even good machines give you little puzzles. Here were mine and how I solved them.
First Layer Too Squished
My text on the first layer was smudging into itself. I bumped the Z offset up by 0.05mm increments using live adjust until the lines were clean. After that, I re-ran leveling to lock it in.
PETG Elephant’s Foot
I lifted the bed temp down by 5°C and added a 0.2mm negative horizontal expansion in the slicer for the first layer only. Suddenly my boxes fit their lids like they’d rehearsed.
Stringing in TPU
I slowed travel a bit, reduced retraction slightly, and lowered nozzle temp by 5°C. The result was good enough that I no longer had to groom my print like a Pomeranian.
Underextrusion on a New Spool
I increased flow to 102% and confirmed my nozzle wasn’t partially clogged. It wasn’t, but the filament was slightly undersized—flow tweak solved it.
Questions I Had Before Buying—and My Answers After Using It
I love a Q&A, especially when I get to be both Q and A.
Can it really do 250mm/s without looking messy?
Yes for some parts, with tuned acceleration and slower outer walls. If you run everything at 250mm/s, quality will step down. Balance is the secret.
Is it truly beginner-friendly?
For a first printer, it’s forgiving and clear. Auto leveling and Z offset genuinely remove a lot of pain.
Does it handle flexible filaments?
Yes. TPU at 35–45mm/s worked well for me. Direct drive helps a lot.
Is it loud?
Quiet motors, average fans. Workroom-friendly but not stealthy.
Is the build plate durable?
Yes, with basic care. Avoid gouging it with tools. Let it cool and flex it for part removal.
Will I want to mod it?
You might not need to for common materials. If you go high-temp or want niche performance, you have a large ecosystem available.
A Second Table, Because One is Never Enough
Sometimes it’s helpful to match use cases to what I actually did.
| Use Case | My Settings | Result |
|---|---|---|
| Fast PLA prototype | 0.2mm layers, 150mm/s walls, 200mm/s infill, 2000mm/s² acc | Done fast, clean enough for fit checks |
| Decorative PLA print | 0.16mm layers, 120mm/s walls, 150mm/s infill | Great surface finish, reasonable time |
| Sturdy PETG bracket | 0.2mm layers, 60% infill, 235°C nozzle, 75°C bed | Strong, minimal stringing after tweaks |
| TPU phone stand | 0.2mm layers, 40mm/s walls, 45mm/s infill | Flexible, accurate, stuck well without warping |
| Tall vase mode | 0.28mm layers, 0% infill, 1–2 perimeters | Stable finish, no wobble issues |
Longevity and the Feeling That It’ll Last
The structure feels solid, the motion is consistent, and nothing rattled loose in my time with it. The Y-axis linear shafts and the dual Z arrangement feel designed to age well. It’s not a delicate machine; it’s a confident one.
Parts and Community Support
If something needs replacing, the Ender ecosystem is a bustling marketplace. Belts, nozzles, extruders, boards—there’s a sea of options. I didn’t need any replacements yet, but I liked knowing they exist and don’t require a treasure map to find.
What I’d Change If I Were In Charge
- Add a slightly quieter part-cooling fan out of the box.
- Consider a textured PEI option alongside the PC sheet for those who prefer it.
- A guided slicer profile wizard would be a nice touch for beginners who enjoy being told what to do in kind tones.
What I Would Absolutely Keep
- The CR Touch + strain sensor combo for leveling and Z offset.
- The auto filament load/unload.
- The structural reinforcement on Z and Y.
- The speed potential—having it there is like having a second gear when you need it.
The Short Version of a Long Love Letter
It’s fast when I need speed, polite when I need quiet, forgiving when I’m rusty, and confident when I’m ambitious. The Creality Ender 3 V3 SE feels like a printer made by people who have actually lost prints at 2 a.m. and wanted to save strangers from the same fate.
The Value Proposition in Plain English
Compared to other printers in the same price range, the V3 SE gives me more speed, simpler setup, and smarter leveling. I don’t need to stock a drawer of mods just to make it competent. It starts out competent and gets better as I learn its edges.
Final Verdict and Recommendation
If your shopping list reads like mine—fast, easy to set up, reliable first layers, and a build volume that’s useful without being every-room dominant—the Creality Ender 3 V3 SE is an easy recommendation. I’d call it a daily driver with a surprising top speed. It’s friendly to beginners, gratifying for intermediate users, and mod-ready for ambitious tinkerers.
I give it a confident 4.5 out of 5. If it came with slightly quieter fans and a magic button for perfect minis at 250mm/s, we’d be talking about a 5. Then again, if it did that, I’d have nothing to learn, and what fun would that be?
In the end, I wanted less waiting and fewer rituals, and I got both. My evenings feel longer, my shelves look fuller, and my first layers have the poise of someone who’s been thanked just for showing up. The Creality Ender 3 V3 SE doesn’t just print fast—it gives me back little stretches of time, which, in my house, is the rarest material of all.
Disclosure: As an Amazon Associate, I earn from qualifying purchases.