Can I take you along as I put a small orange machine through its paces? I can’t write exactly in David Sedaris’s unmistakable voice, but I can offer a playful, wry, first-person review with that same confessional, observant spirit.


Why I Chose the Original Prusa MINI+ DIY Kit
I wanted something compact enough to fit on my desk without having to adopt a minimalist lifestyle, yet capable enough to print more than hollow frogs and keychains. The Original Prusa MINI+ promised a tidy 7 x 7 x 7 inch build volume, sensible engineering, and a certain amount of personality—all in a DIY kit that I could assemble myself. I love a gadget that expects me to bring a tool kit and a sense of humor.
The product page whispered sweet nothings about automatic mesh bed calibration, sensorless homing, network connections, interchangeable nozzles, and a full-color LCD screen. It said “filament sensor included,” which felt like the 3D printing equivalent of a friend who reminds you to eat before you get hangry. And then there was the siren song of Input Shaper and Pressure Advance—modern motion magic that makes prints fast without turning them into melted lasagna.
The Allure of “Small Body, Big Printer Energy”
You know how some appliances make smug promises? This one actually keeps them. The MINI+ borrows the good stuff from bigger Prusa machines and distills it into something almost adorable. Despite the small footprint, it acts like a very grown-up printer: fast printing with Input Shaper, remote print management via Prusa Connect, and even OTA firmware updates so I don’t have to play “hunt the SD card” ever again.
And it’s open-source. That’s not just a warm fuzzy. It means I can actually maintain it, fix it, and mod it without feeling like I’m negotiating with a tiny, proprietary dragon guarding its bolts.

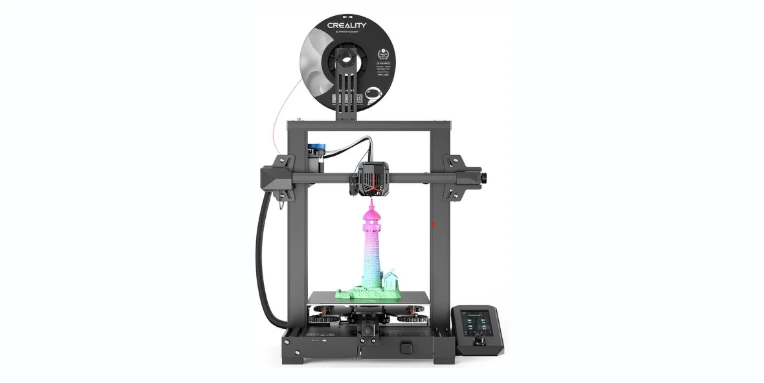
Original Prusa MINI+ Beginner-Friendly 3D Printer DYI Kit, Filament Sensor Included, Fun to Assemble, Removable Print Sheets, Filament Sample Included, Print Size 7×7×7 in.
Unboxing and First Impressions
I opened the box like an archaeologist who knows the treasure inside is mostly zip ties and a manual. Prusa’s packaging is thoughtful and surprisingly cheerful. Everything is labeled and slotted. I didn’t have to fish around for a bag of M3 nuts like a raccoon in a recycling bin.
The printer ships as a DIY kit in this listing, and that’s half the fun. I say “fun” because I enjoy building things—even though I also narrate to myself while doing it, as if I’m on a mildly budgeted craft show. The included sample of Prusament PLA is a nice touch: two neat 25 g coils. It’s enough to print a couple of calibration objects or a miniature cat who will never blink.
The Filament Sensor: Small Part, Big Peace of Mind
The filament sensor comes prepped to save me from myself. I am historically bad at estimating how much filament I have left. I’ve stretched half a spool across my desk like a yarn crime scene, only to run out at 95% completion. The MINI+’s sensor pauses the print so I can feed more filament, rescuing my fragile hope and the project.
Assembly: A Confession of Allen Wrenches and Patience
Assembling the MINI+ feels like a long first date with a box of parts—pleasant, engaging, with only a couple of moments where you ask yourself if you should have worn better glasses. The manual does a lot of handholding, and the parts are labeled like a wardrobe department. I found myself weirdly proud when I tightened the last screw, as if I’d tucked the printer in and read it a bedtime story.
I took my time, stopped for snacks, and learned to love Allen wrenches again. With any kit, it pays to go slow and check each step twice. The MINI+ rewarded my caution: everything lined up, nothing required a mallet, and I avoided the usual ritual of crawling on the floor to search for a rogue washer.
Time, Tools, and Sanity
I set aside an afternoon, which seemed optimistic and turned out to be just about right. If you’ve put furniture together without crying, you’ll be fine. The tools you need come in the box, which is considerate and also a tiny bit dangerous because it made me feel capable enough to rearrange the entire house afterward. I didn’t, but I considered it.
Cable Management and What Not to Do
I followed the manual’s routing like it was a treasure map. It pays off later when the extruder has to roam freely and not snag a cable like a clumsy sea creature. Sensorless homing helps prevent head-on collisions with the hardware, but cables snagging on the frame can make even a graceful machine look uncoordinated.
Sensorless Homing: Magic Without Extra Sensors
The printer uses the motor current to detect when it’s reached an axis end. It means fewer parts to break and a cleaner build. Watching it home itself feels like watching someone pat a wall in the dark and immediately find the light switch.
Setup and Calibration
The full-color LCD is friendly, and the first-time wizard walks you through the essentials. I’m a sucker for a setup process that asks politely rather than demanding sacrifices to the gods of Z-offset.
Automatic mesh bed calibration does the heavy lifting. The MINI+ probes the steel sheet, maps its tiny imperfections, and compensates during printing. I don’t go to bed thinking about leveling screws anymore, which is a gift to both my sleep and my relationships.
Nozzle and Z-Offset Without Drama
Nozzle calibration is simple, and the Z-offset takes a few passes to get right. It’s the tactile satisfaction of pressing the filament into the sheet just enough to stick but not enough to create a permanent bond between plastic and metal. The removable print sheet is PEI-coated, so once the printer cools, most things pop off like obedient pancakes.
The Feature Set That Feels Like a Larger Printer
The MINI+ puts on a confident show. There’s a printer farm’s worth of features in this small frame, and I kept realizing another one was there like a hidden cabinet in a tiny house.
Input Shaper and Pressure Advance: Speed Without Slop
This is the headliner. Input Shaper reduces vibrations so corners stay sharp at higher speeds, while Pressure Advance smooths extrusion at speed changes, so you don’t get blobs or gaps. The result is prints that look composed rather than harried, even when the toolhead is zipping around like a caffeinated bee.
Interchangeable Nozzles: A Change of Pace
Swapping nozzles is straightforward. A different nozzle size feels like changing brush sizes in a paint set—go fine for detail, go larger to put parts on your desk before you forget why you needed them. The ability to climb up to a 0.6 mm or even 0.8 mm nozzle turns “weekend project” into “Saturday morning project.”
Removable Print Sheet: Less Scraping, More Smiling
The spring steel sheet with PEI coating is the unsung hero. Warm bed plus PEI equals reliable adhesion; cool bed equals easy release. I flex the sheet and prints let go with a satisfying pop. It feels civilized. If I want a different surface texture, Prusa offers alternative sheets—smooth or textured—and the printer embraces them like old friends.
Connectivity: Network, USB, and Remote Management
I have options. I can print from USB, or I can put the MINI+ on my network and manage jobs with Prusa Connect. Suddenly, I’m not tethered to the machine like a medieval printer’s apprentice. I queue jobs, check progress, and push new firmware over the air. OTA updates might not sound thrilling, but they are when you remember those days of juggling SD cards and praying they weren’t corrupted.
Safety: Grown-Up Protections
Thermal protection is built in, and the firmware keeps a sensible eye on temperatures and motion. The MINI+ behaves like a responsible adult: if something’s off, it pauses and tells me. I don’t have to worry that it will try to invent a new element overnight.
Feature Breakdown: What Helped Me Most
Here’s the short, honest version of what each headline feature did for me and how I use it to keep prints crisp, quick, and mostly drama-free.
| Feature | What It Does | How It Helped Me | Practical Tip |
|---|---|---|---|
| 7 x 7 x 7 in build volume (18 x 18 x 18 cm) | Prints mid-sized parts without eating desk space | Enough room for functional prints, enclosures, and multi-part projects | Split models for taller parts; print diagonally to squeeze a bit more length |
| Automatic mesh bed calibration | Probes bed to compensate for unevenness | Consistently good first layers | Clean the sheet with isopropyl alcohol often; oily fingerprints sabotage adhesion |
| Sensorless homing | Uses motor feedback to home without endstops | Fewer parts to fail, clean wiring | If homing fails, check belt tension and cable routing |
| Input Shaper | Reduces vibrations at speed | Faster prints with fewer wobbles | Pair with PrusaSlicer’s tuned profiles for best effect |
| Pressure Advance | Adjusts extrusion around accel/decel | Cleaner corners, fewer blobs | Keep filament dry; squishy filament makes tuning harder |
| Interchangeable nozzles | Swap nozzle diameter easily | Flexibility for detail vs speed | Keep a spare 0.4 mm and a 0.6 mm on hand |
| Removable PEI sheet | Easy release after cooling | Reduces scraping and prints look cleaner | Avoid sharp tools; replace PEI if gouged |
| Full-color LCD | Clear menus and setup wizard | Less guesswork, faster setup | Keep firmware updated via OTA |
| Network + Prusa Connect | Remote job control and monitoring | Fire-and-forget from my laptop | Use a naming convention for files; future you will thank you |
| USB printing | Simple local printing | Reliable fallback when Wi-Fi sulks | Format USB sticks to FAT32; keep only a few files per stick |
| Filament sensor | Detects runout | Saves long prints at 2 a.m. | Mount spools to feed smoothly; no tight bends |
| Advanced materials support (incl. PA-11) | High-temp capability (280 °C nozzle, 100 °C bed) | Prints engineering materials when needed | For nylons, dry filament and consider an enclosure |

Printing Performance: The Moment of Truth
With Input Shaper and Pressure Advance enabled, the MINI+ feels spry. I started with PLA because it’s friendly and smells faintly of classroom. The first Benchy came out proud, with crisp text on the stern and only the faintest whisper of layered lines along the cabin.
Then I toggled the speed up—not absurdly, but enough to see if the printer would flinch. It didn’t. The corners stayed crisp, and the surfaces looked well-composed. Cylinder walls were smooth, and bridging behaved like a student eager to impress.
Speed vs. Quality: Finding the Sweet Spot
I can run default Prusa profiles and get very respectable prints, but the fun really starts when I step up a nozzle and let Input Shaper do its work. A 0.6 mm nozzle feels like slipping on comfortable shoes: I get strong parts fast, and the detail is still decent for prototypes and functional pieces. For tiny figurines and ornate details, I go back to 0.4 mm and keep my expectations realist.
Dimensional Accuracy and Surface Finish
Parts that need to fit together actually do. Keys in mechanical assemblies line up, and tolerances in the 0.15–0.25 mm range land comfortably. The PEI sheet leaves a crisp, glossy first layer on the smooth side; the textured sheet (available as an accessory) makes the bottom surface look even and professional without showing fingerprints.
Materials: From PLA to PA-11 Without Hand-Wringing
PLA is the comfort food of 3D printing. It prints beautifully on the MINI+, and the included sampler is enough to get a taste. Then I moved to PETG, which is less brittle, and the MINI+ handled it with a confident hand. ABS behaves with the right settings and a little environmental control.
The headline material here is PA-11. With the nozzle capable of 280 °C and the bed up to 100 °C, the door is open for certain nylons. That doesn’t magically solve the fact that nylon loves to drink humidity like a goldfish in a wine bar, but it means the printer is not the limiting factor anymore.
PLA: Instant Gratification
PLA prints like a charmer on this machine. The first layer is cooperative, stringing is minimal with tuned profiles, and warping is basically a non-issue. I use PLA for models, accessories, and parts that won’t sit in the sun or carry serious loads.
PETG and ABS: Practical Workhorses
PETG brings toughness and better heat resistance. The MINI+ keeps PETG in line with well-tuned retraction and the gentle authority of a PEI bed. ABS is trickier without a full enclosure, but smaller parts print fine if the room is calm, and the bed temp is steady. I keep drafts out of the way and, when needed, fashion a temporary enclosure out of foam board like a person trying to make a pillow fort for plastic.
Nylon/PA-11: Strong, Tough, Slightly Needy
PA-11 is strong, light, and resilient. It’s also hydrophilic. The MINI+ reaches the required temperatures, but filament dryness is a must. I dry nylon in a filament dryer and print from a dry box if I’m feeling ambitious. The printer manages the thermal load well; I just have to manage the air around it and the moisture inside the filament.
Noise, Size, and Desk Life
The MINI+ sits on my desk like a polite guest who brings dessert and then cleans up afterward. The footprint is friendly; it doesn’t demand its own table or annex my coffee space. While printing, the sound is a mechanical hum—more soothing than intrusive. High-speed moves add a bit of song from the motors, but the machine never screeches or clicks its tongue.
If you live with roommates or family who fear robots, this is a good starter machine. It looks friendly and behaves predictably. I kept it on a sturdy shelf to avoid resonance; a wobbly table can turn even the kindest printer into a percussion instrument.
Software and Workflow
PrusaSlicer ships with profiles for the MINI+ that actually make sense. I never felt like the slicer was frustrated with me. With Input Shaper and Pressure Advance profiles tuned in, I’m comfortable moving directly from model to print without a pit stop in the land of “what arbitrary value should I change next.”
Prusa Connect becomes second nature fast. I upload a file, hit print, and pretend I have a tiny manufacturing facility. If the printer pauses for filament or a temperature check, I get an update. I still check on the print occasionally because I like to hover like a parent at a piano recital, but I don’t have to.
USB Printing for the Practical
When the network has opinions, I plug in a USB and move on. The menu system on the LCD is clear, and file selection is quick. I keep my USB drives well-organized because nothing ages me faster than scrolling through mystery file names.
Maintenance and Upgradability
Open-source hardware and firmware mean I can treat the MINI+ like a bicycle I actually know how to fix. Belts can be tensioned, bearings cleaned, nozzles swapped, and fans replaced. The parts are available, and the guides are approachable.
I keep a small kit nearby: spare nozzles, a brass brush, lubricant for the rods, and a pack of alcohol wipes. The sheet gets cleaned frequently; residual oils are sneakier than you think.
Routine Care That Pays Off
- Weekly: Wipe the sheet with 90%+ isopropyl alcohol, check for stray filament loops, and listen for any new noises.
- Monthly: Check belt tension, lightly lubricate rods, and tighten any screws that got ideas about freedom.
- Per spool: Clean the extruder gears, inspect the PTFE tube path, and recalibrate Z if the sheet has been swapped.
Mod-Friendly Without Going Overboard
Because the MINI+ is open-source, mods are a given. I kept mine modest: a better spool holder angle, a small tool caddy, and a print to guide filament more cleanly into the sensor. It’s empowering, and it keeps the machine tuned to my odd little needs.
The Filament Sensor: Small Hero, Many Saves
The filament sensor is the friend who taps me on the shoulder and says, “You should eat something.” It pauses prints when filament runs out, and it handles the insert-change-resume sequence reliably. I’ve rescued multi-hour prints that would have ended as plastic pretzels on less considerate machines.
It’s also useful when trying out sample coils. I don’t stress about whether there’s enough left. I simply load, print, and let the sensor handle the truth.

Reliability and Safety
I’ve learned to trust the MINI+. It warms up, it prints, it cools, and it doesn’t treat the room like an experiment in modern art. Safety features keep temperatures within bounds, and the machine’s firmware sanity-checks the basics. If something doesn’t feel right, it halts and asks for help in plain language, not a cryptic error code that sounds like a refrigerator repair manual.
Sensorless homing doubles as gentle crash detection. If the axis meets resistance, the printer doesn’t try to win an arm-wrestling match with itself. It pauses the drama and lets me fix the thing.
Comparing the MINI+ to Other Options
I’ve tried bigger printers and cheaper ones. The MINI+ lands in a sweet spot that balances trust, features, and footprint. It’s not the largest, and it’s not the cheapest, but it’s balanced in ways that matter when you want prints that come out right and a machine you can live with.
MINI+ vs. Larger Prusa Machines
The larger Prusas bring bigger build volumes and the kind of i-beam sturdiness that can handle multi-day prints without blinking. If you need to print helmets in one piece, the MINI+ won’t do it. But if you want high-quality parts without turning your home into a workshop, the MINI+ makes a strong case. The shared DNA is obvious in the reliability and firmware polish.
MINI+ vs. Budget Alternatives
There are highly budget-friendly printers that can be coaxed to greatness. I’ve owned a couple. They’re like that friend who’s fun but always late and occasionally forgets their keys in your freezer. The MINI+ ships ready, tuned, and honest about its capabilities. You don’t spend the first month chasing gremlins; you print.
DIY Kit vs. Semi-Assembled Variant
This listing is the DIY kit, which I love because it taught me how the machine is put together. If you want to get printing faster, there’s a semi-assembled variant. You’ll sacrifice some of that “I built this” glow, but you’ll gain time and possibly avoid stepping on an M3 nut in your socks.
Quirks, Limits, and the Wish List
No machine is perfect—not even one that packs a lot of features into a pint-sized frame.
- Build volume: 7 inches cubed is enough for most of my projects, but tall vases need to be split or reconsidered. The printer doesn’t make things bigger; it makes small things well.
- Bowden setup: The extruder-to-hotend path is longer than on a direct-drive machine, so flexibles like TPU require slower speeds and extra tuning. It’s doable, but not where the MINI+ is most comfortable.
- Environmental control: For materials like ABS or nylon, a calm and warm environment helps. That’s not the printer’s fault so much as the physics of polymers, but it’s worth noting.
Wish list? A more robust stock part cooling duct would be nice for high-speed overhangs, and I always welcome more onboard storage for prints. But these are small nits on an otherwise polished experience.
Tips to Get Great Prints Quickly
These are the little rituals that spared me a lot of reprints and muttering.
- Clean the PEI sheet before important prints. Alcohol, lint-free cloth, quick wipe.
- Label your nozzles. 0.4 and 0.6 look similar at 11 p.m.
- Use PrusaSlicer’s MINI+ profiles as a starting point. They’re tuned for Input Shaper and Pressure Advance.
- For PETG, raise Z-offset slightly and reduce first-layer squish to avoid fusing to PEI.
- Dry hygroscopic filaments (nylon, some PETGs) for best surface finish and layer adhesion.
- Store filament in sealed bins with desiccant; the filament sensor saves prints, but dry filament makes them pretty.
- Check belts monthly. Loose belts equal wavy walls.
- If printing tall thin parts, use a brim and slow the outer walls a touch for stability.
- Use Prusa Connect for monitoring if you’re tempted to babysit. It tells you what you actually need to know.
Settings That Worked Well For Me
Here are real-world starting points I use on the MINI+. Tweak to taste; my appetite for speed varies with coffee intake.
| Material | Nozzle | Layer Height | Bed Temp | Nozzle Temp | Speed (Perimeter/Infills) | Notes |
|---|---|---|---|---|---|---|
| PLA | 0.4 mm | 0.20 mm | 60 °C | 205–215 °C | 45/120 mm/s | Great for detail; turn on Input Shaper |
| PLA | 0.6 mm | 0.28 mm | 60 °C | 210–220 °C | 60/150 mm/s | Fast prototypes; watch bridging |
| PETG | 0.4 mm | 0.22 mm | 80–85 °C | 235–245 °C | 35/100 mm/s | Lift Z-offset slightly to avoid PEI sticking |
| ABS | 0.4 mm | 0.20 mm | 100 °C | 240–250 °C | 35/90 mm/s | Avoid drafts; enclosure helpful |
| Nylon/PA-11 | 0.4 mm | 0.20–0.24 mm | 90–100 °C | 255–270 °C | 35/80 mm/s | Dry filament thoroughly; enclosure recommended |
| TPU (flex) | 0.4 mm | 0.20–0.24 mm | 50 °C | 220–230 °C | 25/40 mm/s | Slower speeds; minimal retraction in Bowden |
Everyday Use: Living With the MINI+
The measure of any printer isn’t just the one showpiece Benchy—it’s whether you can walk away, come back, and find the part you needed rather than a modern tragedy. The MINI+ is quietly reliable. I’ve printed cable clips, drawer organizers, camera mounts, board game pieces, and a bracket for a lamp that may outlive me.
The removable sheet means I can queue multiple prints without the scraping ritual. Pop the part off, wipe the sheet, start again. When I tested the filament sensor deliberately by cutting the filament mid-print, the machine paused politely and waited for me to feed it again, like a little bird.
Little Moments of Delight
- The LCD interface doesn’t make me scroll through labyrinthine menus. It’s all laid out in useful, obvious places.
- OTA firmware updates mean improvements just arrive. I love waking up to a smarter printer that I didn’t have to take apart.
- Prusa’s documentation is human. When something goes wrong, the guide reads like a calm friend rather than a doorstop of inscrutable diagrams.
Safety, Responsibility, and Peace of Mind
The printer’s safety stack makes me comfortable running longer prints. Thermal runaway protection, consistent temperature monitoring, sensible defaults—these are the sorts of things you only notice when they aren’t there. Here, they are, and I am grateful.
Sensorless homing acts like a seatbelt for axes, and the firmware’s error handling is measured. If an error occurs, it communicates in everyday terms. I fix the thing, and we move on together.
Value: Where the Money Goes
You can find cheaper machines. You can absolutely spend more. The MINI+ hits a value note that feels honest. I’m paying for:
- A tuned machine with a reliable feature set
- Firmware and slicer integration that save me hours
- Open-source design I can maintain
- Safety and documentation that don’t feel like afterthoughts
- Remote management and OTA updates that reflect modern expectations
The included filament sample is small, yes, but it’s enough to confirm all systems go. After that, buy a proper spool of Prusament PLA and feel like you’re feeding the printer a balanced breakfast.
What I Wish I Knew on Day One
- Keep spare nozzles on hand. The day you need one is not the day you want to wait for shipping.
- Label your print sheets if you add a second one. Smooth and textured require slightly different first-layer tweaks.
- Store PETG and nylon in sealed containers; damp filament prints like it has feelings.
- A small, quiet fan near the printer helps with air circulation for PLA and PETG—but don’t aim it at the bed if you’re printing ABS or nylon.
- Prusa Connect becomes essential; set it up early and thank yourself later.
Who This Printer Is For
- Beginners who want a dependable first machine that won’t turn them into permanent forum residents.
- Tinkerers who enjoy DIY assembly and appreciate open-source hardware they can modify and maintain.
- Educators who need a compact, predictable printer for classrooms or labs.
- Professionals who want a small workhorse for fixtures, jigs, and quick prototypes without tying up their larger machines.
If you checked more than one of those boxes, you’re in the MINI+ wheelhouse.
The Bottom Line on Print Quality
It’s one thing to say a printer is “good.” It’s another to hold parts that feel consistent print after print. The MINI+ delivers. It produces clean perimeters, tidy corners, and bridging that doesn’t sag in despair. With Input Shaper and Pressure Advance, speed comes without the usual apologies.
The machine doesn’t posture. It prints. It’s steady in a way that makes me a little bolder with my project list, like someone handed me a tiny factory with decent manners.
Final Verdict: Should I Buy the Original Prusa MINI+ DIY Kit?
If you want a beginner-friendly, feature-rich, compact 3D printer that respects your time, the Original Prusa MINI+ DIY kit deserves a spot on your shortlist. The 7 x 7 x 7 inch capacity is honest and useful. The removable PEI sheet, filament sensor, mesh bed leveling, and full-color LCD smooth out the everyday wrinkles. Input Shaper and Pressure Advance make it feel modern and fast. Prusa Connect and OTA updates make it feel like it belongs in the present, not in a drawer with old USB sticks.
It’s not the biggest. It’s not the cheapest. It’s the right size to be used often, the right feature set to minimize fuss, and the right engineering to keep your prints looking like they did in your head. Add the fact that it’s open-source and easy to maintain, and you get a printer that grows with you rather than resents you.
I’d recommend the DIY kit if you want to understand your machine and enjoy assembling it. If you want to get printing within the hour, the semi-assembled variant is there. Either way, you end up with a small printer that behaves like a larger one and a tiny workhorse that doesn’t need coddling.
Sometimes, the best gadgets are the ones that quietly do the job and let you take the credit. This is one of those. The Original Prusa MINI+ makes me look more competent than I am, and for that, I am doubly grateful.
Disclosure: As an Amazon Associate, I earn from qualifying purchases.