Have you ever embarked on what you enthusiastically thought would be the latest and greatest 3D printing project, only to find yourself knee-deep in a sea of problems that you hadn’t anticipated? If you haven’t, well, I admire your luck, but for the rest of us mere mortals, troubleshooting 3D printing issues can be a rite of passage—or a recurrent headache. There’s something deeply therapeutic in seeing your imagined design come to life layer by layer. But when things go awry, the allure of these three-dimensional wonders can quickly feel like an intimate betrayal. Let’s journey together through the maze of common 3D printing problems, always with the hope of printing another day.

Understanding the Basics of 3D Printing
Before diving into the common issues and their fixes, let’s take a step back to understand the basics. Whether you’re a veteran in the field or a curious novice, it’s crucial to start on the same page.
What is 3D Printing?
3D printing, otherwise known as additive manufacturing, is the process of making three-dimensional solid objects from a digital file. It involves laying down successive layers of material until the object is complete. Think of it as a high-tech layering cake—but this time, the cake is your blueprint’s reality.
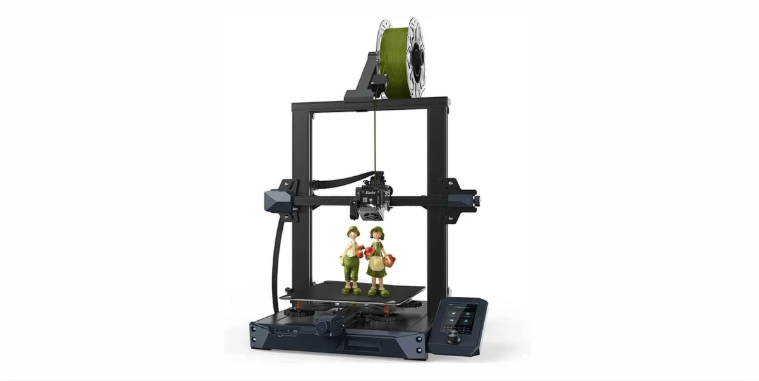
Essential Components of a 3D Printer
To better navigate the world of 3D printing, it’s best to familiarize ourselves with some key components:
| Component | Function |
|---|---|
| Print Bed | The surface where the printed object is constructed. |
| Extruder | Responsible for melting and depositing the filament. |
| Filament | The thermoplastic feedstock used by the printer, often in spools. |
| Stepper Motors | Drives the movement of various parts like the print head and bed. |
| Control Board | The “brain” of the printer, executing commands from the software. |
Understanding each component’s role can help diagnose where things might go wrong—and trust me, they sometimes do.
Common 3D Printing Problems and How to Troubleshoot Them
Armed with a fundamental understanding of what we’re dealing with, let’s embark on this journey of identifying common problems and how to fix them. We won’t achieve miracles today, but alleviation? Yes, that’s definitely in our sights.
Problem #1: The Print Won’t Stick to the Bed
Ah, the print that floats away—it’s like trying to stack Jenga blocks on an ice rink. For your model to come to life, the first layer is crucial, and its failure to adhere can thwart the entire print.
Possible Causes:
- Improper Bed Leveling: Perhaps the bed isn’t level. If this is the culprit, the nozzle may be too far from or too close to the bed, affecting adhesion.
- Incorrect Temperature: The bed or nozzle might not be at the correct temperature, preventing adequate filament melt and adhesion.
- Surface Not Prepared: The print bed may not be clean or might need an adhesive.
Solutions:
- Level the Bed: Use a piece of paper or feeler gauge to ensure the nozzle is at the correct distance from the bed across all points.
- Adjust Temperature: Verify the recommended printing temperature for your filament type and adjust settings accordingly.
- Prepare the Surface: Clean your bed with isopropyl alcohol, and consider applying an adhesive substance like a glue stick or specialized 3D printing adhesive.
Problem #2: The Extruder is Clogged
Much like a blocked nose in the winter, a clogged extruder can be a formidable foe. You want your filament to run smooth like melted butter, not stop like a cork in a bottle.
Possible Causes:
- Low-Quality Filament: Inferior filaments can easily jam due to inconsistent diameter or impurities.
- Dust or Debris: Over time, dust can gather in the printer and clog the nozzle.
Solutions:
- Filament Check: Ensure you purchase and use high-quality filament.
- Regular Maintenance: Periodically check for and remove any build-up of dust or filament debris.
- Clean the Nozzle: Utilize a needle or other thin wire to gently clean the nozzle. There are also professional cleaning filaments available that you can cycle through your extruder.
Problem #3: Stringing or Oozing
The print that looks like it’s had one too many hair plugs, stringing or oozing is when strands of plastic appear between parts of your model. While it might resemble modern art, it’s likely not what you had in mind.
Possible Causes:
- High Extrusion Temperature: Too much heat can cause excess filament to drip from the nozzle.
- Retraction Settings: Improper settings might not pull back enough filament when moving the print head.
Solutions:
- Reduce Temperature: Lower the extruder temperature in small increments to reduce filament fluidity.
- Adjust Retraction Settings: Increase retraction distance or speed in your printer’s software settings.
Problem #4: Layer Shifting
Layer shifting might remind you of sand castles hit by a wave: the base is strong, but the upper floors betray a wobbly mess. This is when layers of your print don’t align correctly, causing distorted results.
Possible Causes:
- Mechanical Obstruction: Something might be obstructing the printer’s movements.
- Loose Belts: The belts driving movement could be loose, impeding the print’s alignment.
Solutions:
- Clear Obstructions: Ensure that there’s nothing physically blocking any part of the printer’s tracks.
- Tighten Belts: Gently adjust the belts so they’re taut but not overtightened.
Problem #5: Overheating
Much like a bottle of soda left in a hot car, plastic can deform when it’s too warm. Overturning your project into a Dali-esque interpretation rather than your original intent.
Possible Causes:
- Improper Cooling: The printer’s cooling fans might not be functioning properly.
- Excess Heat: Environmental temperatures could be adding to the problem.
Solutions:
- Check Cooling Fans: Make sure that cooling fans are operational and place them correctly.
- Adjust Printing Speed: Printing at a slower speed can sometimes help manage heat better.
Additional Tips for Smoother 3D Printing
While solving specific problems is incredibly satisfying, prevention is better. Keep these general tips in the pocket of your brain, where you keep all the other really useful things you sometimes randomly pull out at dinner parties.
Regular Maintenance
Taking out time to clean and maintain your printer can prevent a number of issues. Remove dust, check connection integrity, and make sure everything is running smoothly.
Calibration is Key
Whether it’s leveling the bed or setting the right temperature, calibration helps prevent problems before they transpire. Treat your printer much like you would a musical instrument—always finetuning, always adjusting.
Community Engagement
Participate in online forums or local 3D printing clubs. Sharing problems and exchanging solutions with fellow enthusiasts can be incredibly enlightening. There’s always a satisfaction in knowing someone else has encountered exactly the same issue and felt the same panic that you have.
Up-to-Date Software
Keep your printer’s firmware and slicing software updated. Manufacturers often release updates to improve efficiency and tackle common issues.
Trying New Materials
While it’s tempting to purchase the cheapest filaments, investing in quality materials can make a world of difference. Not only will your prints look better, but they’ll be more durable too.
Conclusion
3D printing is as much an art as it is a science, demanding patience, curiosity, and perhaps the occasional madness. Troubleshooting common problems is part and parcel of the journey, and while it can sometimes feel like one step forward, two layers back, the rewards can be significant. The next time your print takes a ghostly shape all its own or decides not to stick its landing, remember: with every misprint, you’re one step closer to mastering the endless possibilities that 3D printing offers. Now, go turn those troubles into triumphs, one layer at a time.